Email is an integral part of our lives, and Apple’s Mail app is the perfect way to send, receive and manage your messages.
Apple introduced its own Mail application with the very first version of OS X, although it wasn’t a new program, having been developed for the NeXTSTEP operating system that would become Apple’s flagship OS. At the time it had plenty of competition from the likes of Microsoft’s Outlook and later Entourage, Netscape’s Communicator, Eudora and others, but as Mail matured it started to win over more and more users.
To begin with, its functionality was relatively limited but this was actually one of its better points. Where other mail apps had a million features that most people didn’t use, Mail was more lightweight.

Email is an integral part of our lives
As email grew to dominate every aspect of our lives, Mail on the Mac came of age and quietly added features like iLife integration, Spotlight support and behind the scenes, ActiveSync and Microsoft Exchange Server support for use in corporate environments. With the advent of iOS and iCloud, Mail has moved to devices like the iPad and iPhone too, and incorporated advanced new features such as syncing mail across all your different Apple devices. Although it looks simple on the surface, Mail has lots of tools and tricks you may not be aware of, so read on to find out how to master Mail on your Mac…
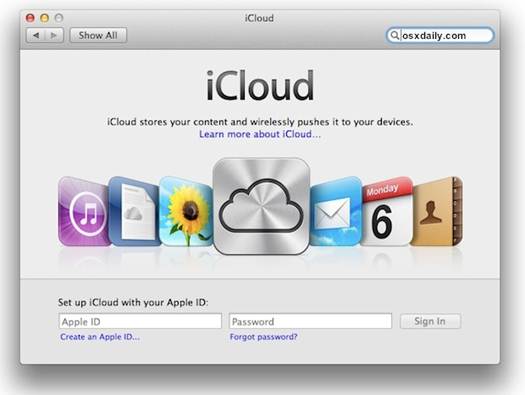
1. Setting up Mail in OS X
Setting up multiple email accounts isn’t as hard as you think
- Set up a new account Add an account at any time by going to Mail’s Preferences and locating the Accounts tab. There, click the plus button to add a new account and enter your name, email address and password in the required boxes. Mail will automatically detect if you have entered an address from a big mail provider like Hotmail, Gmail or Yahoo, and attempt to make all the under-the-hood settings for you. If your details check out, your account will be set up automatically when you press ok.
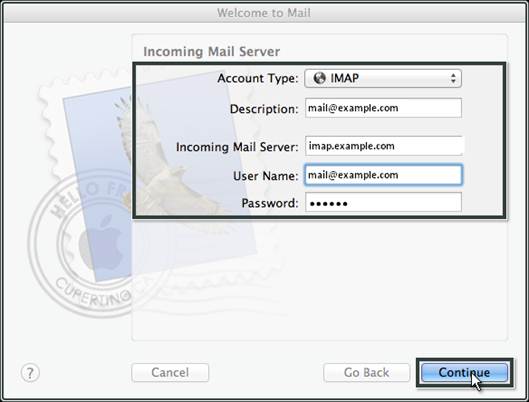
Set up a POP or IMAP based email using Mail’s setup assistant
- Choose the right account type Mail supports POP, IMAP and SMTP mail protocols. If you have your own domain and ISP, you will probably be using POP and SMTP to receive and send mail respectively. Your settings might look something like pop.mydomain.com and smtp.mydomain.com. Many web-based email services like Gmail support both, though they recommend using IMAP. IMAP offers two-way communication between your web-accessed Gmail account and the Mail app. So when you log into Gmail using a web browser, actions you perform on email clients and mobile devices will instantly and automatically appear in Gmail. By using IMAP, all your mail is accessible from any device at any time.
- Customize Mailbox behaviours You can streamline the way you work with Mail by setting up some handy automatic behaviours. If you go into the Preferences > Accounts section and click the Mailbox Behaviours tab, you have several options that can help with housekeeping. The first lets you choose to automatically delete sent mail when it reaches a certain age, when quitting Mail or to never delete it. The same options are available for mail marked as junk, and it’s perhaps more likely that you will choose to use auto-delete here. Finally the same deletion options are available for mail that has been placed in the Trash, and there’s an option to move deleted messages to the Trash mailbox, which helps keep things tidy.
Mail supports several protocols and you can see what you’re using in the Accounts preferences section
- Automatically check for mail In Mail’s Preferences > General tab, you can choose to have the app check for new mail at specified intervals ranging from every minute to every hour, or manually, meaning it only checks when you press the Send and Receive button. Checking every minute is pretty handy on a Mac unless you’re worried about battery life or perhaps bandwidth. And equally on an iOS device you might want to set this to something less frequent, or to manual, in order to reduce the drain on your data allowance.
- Check individual accounts In the Preferences > Accounts section you can set for each individual account whether it is included in the ‘check for new messages’ process. Tick this box and Mail will look on the server whenever a check is performed. Uncheck it, and it won’t. This means that you can have some accounts checked regularly and others only manually handy for separating work and personal accounts, for instance.
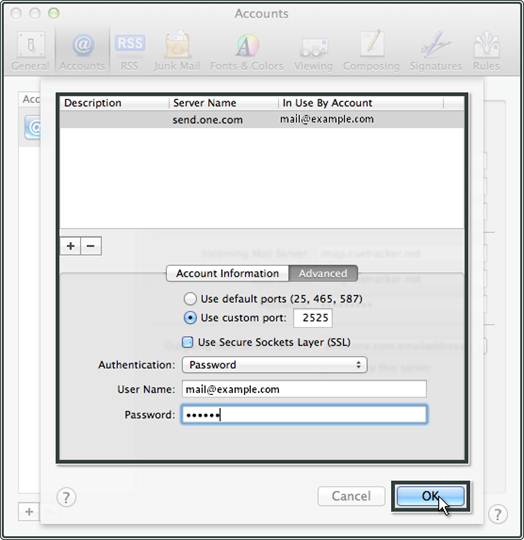
- Use your own ISP Many people have their own.com or similar email address, run through an ISP or hosting company. Setting these up is similar to setting up a Gmail or Hotmail account. You need your provider to tell you the SMPT, POP or IMAP settings and you need your username password and email address. This kind of stuff has been simplified in recent years and you usually find setup very straightforward.
2 .The interface explained
Mail’s interface is sleek but hides many useful features
- Send, receive and New mail The button with the envelope icon is Mail’s send and receive all command, which polls all servers for new mail. You can set some accounts to be included in this and others not, if you prefer. The New mail button to its right will open up a new message window.
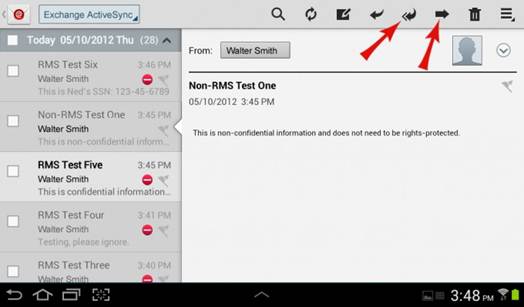
- Command buttons Here you find the Reply, Reply All, Forward and Mark As Junk buttons as well as the option to delete a message using the button with the Trash icon. To the right is the Flag button where you can assign various coloured flags to specific emails, making them easy to spot and sort.
Command buttons
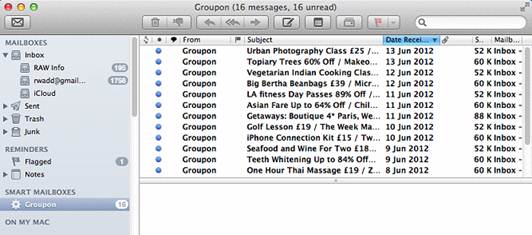
- The message list Seen here in the newer, iOS style view (don’t worry, you can use Classic view too) this list of emails can be filtered by clicking on a specific mailbox on the left. Alternatively they can be sorted using different criteria such as date received, name of sender or message size. Clicking a message causes its content to appear in the section to the right.
- The mailboxes You can see both local and remote mailboxes in this list, and drag messages from any list into any other list. Smart mailboxes live alongside regular ones, and you can expand IMAP mailboxes to see their contents. Here, it’s Gmail that’s being used.
- Formatting controls These buttons let you add an attachment (you can also drag and drop from the Finder), change the text formatting of the message, add Stationery from a preset list of templates and also open your iPhoto browser directly in Mail to drag and drop images, which can be resized to control the overall size of the message.
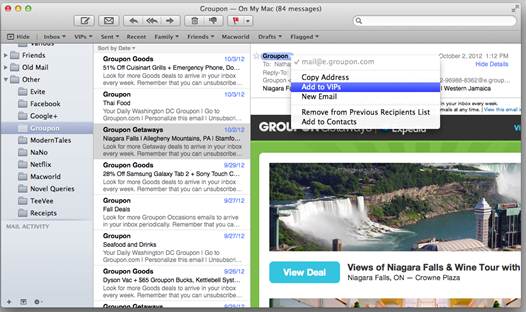
- To, from and Cc You can start typing an address and Mail will autocomplete it if the recipient is in your Contacts or Mail database already. The same goes for Cc which is used to copy people in. If you have more than one account set up, choose here which one it gets sent from, making it easy to send from a different account without restarting a message.
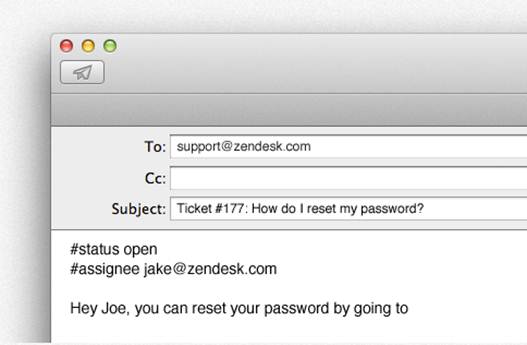
You can start typing an address and Mail will autocomplete it
- Customize field Click this icon to reveal additional fields when composing a message. As well as To and Cc you can also choose Bcc, which adds a recipient without revealing their address to other recipients, Reply To, in case that’s different to the account being sent from, and also a Priority field so you can specify if a message is urgent.
- Templates Mail in OS X 10.8 comes with a range of pre-formatted templates that you can customize to suit your requirements. It’s also possible to copy and paste HTML into a message, email a web page as HTML, a PDF or a link, and email content directly from other iLife app of the Finder.