Master Apple Mail (Part 2) – Send better emails from your Mac
Master Apple Mail (Part 1) – Setting up Mail in OS X, The interface explained
Keeping on top of your messages need not be a full time job
- Use the contextual menu As in many apps, a lot of the commands that are available from the menu bar menus are also available by right clicking on an item and calling up the contextual menu. This is almost always quicker and provides instant access to things like flagging, moving, deleting, forwarding and applying rules to messages. It also works when you have selected more than one message, by holding down the key while also clicking with the mouse.
- Take advantage of VIP contacts In OS X 10.8 and iOS 6, Apple Mail enables you to define email senders as VIP contacts. Setting one up couldn’t be simpler. Select any email address and click on it in a message to reveal the drop-down menu. From here, select Add To VIPs. Now, all mail from that and other VIP contacts will appear in the VIPs tab across your devices. Think of these as smart folders – they’re good for quickly accessing mail from different accounts but from only a specified list of people. Repeat this trick but choose ‘Remove…’ to take someone out of your VIP list.
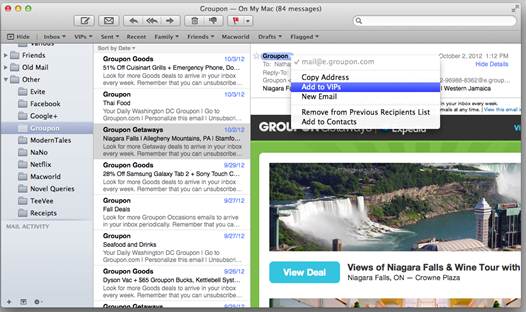
Assign contacts as VIPs and you can see mails from all VIPs in a single mailbox
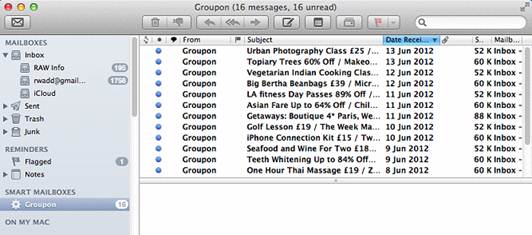
- Flag up your messages Flagging is a great way to quickly spot and select messages in your mailboxes based not on subject or sender but on your tag. Choose one or more messages and then either right click or choose Message > Flag and assign one of the available coloured flags to the mail. Flagged mail can then be accessed from the Flagged tab in Mail. Different coloured flags show up in separate sections, so it’s simple to use multiple categories.
- Move messages around Regardless of whether you are using mailboxes that live locally on your Mac or remotely on a server, you can move stuff around pretty freely between them all. Select one or more messages menu and then select Move To or Copy To and choose a destination. You can move or copy mail between any local mailboxes, or remote mailboxes that use IMAP. Remote mailboxes that use POP won’t be available for this task unless you switch them to using IMAP.
- Redirect a message Redirecting is different from forwarding a message in that it doesn’t add the formatting that goes with a forwarded message. Select a message and choose Message > Redirect or right-click to do the same and an identical copy of the message will be placed into a new mail, minus the colours and formatting that usually get added when you forward one.
- Mark mail as junk If you use junk filtering, Mail can get pretty good as spotting junk mail when it arrives. If something sneaks through you can right-click on it and choose to Mark As Junk. If you do this, Mail will learn and next time probably not let a similarly formatted message through. The more you perform this action, the smarter Mail gets, so it’s worth persevering with.

If you use junk filtering, Mail can get pretty good as spotting junk mail when it arrives
- Where are attachments kept? Mail stores attachments, both incoming and outgoing, in a folder called Users/username/Library/Mail Downloads. If you are running OS X 10.8 you may have to use the Go To Folder command to see it, since the user library is hidden by default. (alternatively, launch Terminal from Spotlight, type ‘chflags nohidden ~/Library/’, press Enter and the Library will become visible.) Here you should find all attachments for all your mails. By right-clicking on an attachment within a message you can choose to open it, Quick Look it or save it to the main Downloads folder or to a specific location. So it’s really quite easy to work with attachments in Mail.

Use Mail’s Rules to set up criteria for filtering received mail
- Use Rules to your advantage In Mail’s Preferences > Rules section you can set up and manage Rules. These are sets of criteria that Mail applies when receiving new messages or sorting existing ones. They’re really flexible, and you can set them up for any eventuality. So an example rule might be if a sender is not in your address book, filter the mail to a specific folder and mark it as junk. Or if a mail has been sent to a specific address, send an automatic reply, which is the same as an out of office response. Layer up different criteria and multiple Rules to have Mail take the work out of sorting email.
- Use signatures to save time Ever get tired of putting your phone number and address into emails? Go into Mail’s Preferences > Signatures menu and you can add customized text and pictures so that every outgoing mail includes this information. In OS X 10.8 you also now have the ability to use a different signature for each of your accounts, which is a great help if you have different addresses for work, personal stuff and so on.
Setting up a smart mailbox
- Add a Smart Mailbox A smart mailbox is essentially a place where messages appear based on criteria you define. To create one, go to the small plus icon at the bottom left of Mail’s window and click it. Choose to add a new Smart Mailbox and then give it name based on what it’s going to be used for. For example, ‘Mails from Graham’, which we’ll reserve for an individual.
- Add some criteria In the first field, choose what Mail should look for in a message. In this case it’s that the mail is from a person, whose email address we enter. We can also click the plus arrow to add a second criteria. Let’s say we want the mailbox to only show mails from the last three months, so we add this.
- Finish up When you’ve added all the relevant criteria (remember, you can choose to have the rules applied for any or all of them) click OK and the mailbox is created. It will automatically update itself with new content that matches the criteria we entered; we also specified a three-month age limit, so it won’t show older emails.