How to write advanced scripts to control a multitude of Windows features with gestures
In the last issue of Computeractive we explored Strokes Plus, a free time saving tool that speeds up common actions by giving you the ability to trigger them using gestures shapes drawn on the screen using the mouse. In this second workshop we’ll take a look at some of the more advanced features of the program, including revealing the full power of the scripts that you can use.
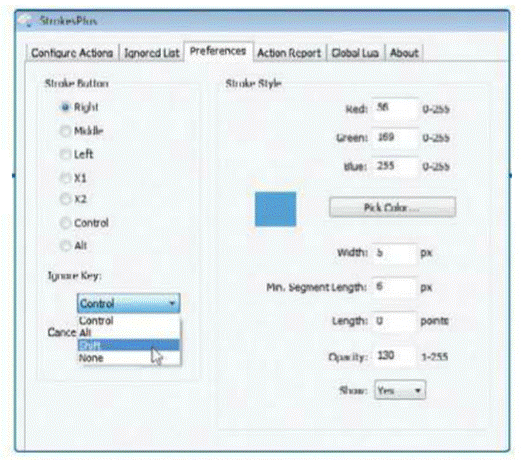
- You Should Already Have Strokes Plus installed but if not, refer to the previous issue of Computeractive for instructions. If you’re confident enough to proceed without reading the first installment, then download the program from www.strokesplus.com. In this workshop we’ll start by taking a look at some of the preferences that weren’t covered last time around. To start, right-click the Strokes Plus icon in the Notification Area icon and choose Preferences.
- Strokes Plus Works By recognising gestures made with the mouse when a particular button (usually the right one) is held down. However, there may be times when this button is needed for other purposes. To deal with this, use the Ignore Key section to define a key that, when pressed, ensures that mouse movements will not be interpreted as a gesture make a selection from the dropdown menu. Here we’re selecting Shift, so if we wish Strokes Plus to ignore mouse movements when holding down the right mouse button, we’d hold down Shift at the same time.

Here we’re selecting Shift, so if we wish Strokes Plus to ignore mouse movements
when holding down the right mouse button, we’d hold down Shift at the same time.
- Use The Stroke Style section of the Preferences tab to customise the appearance of the tracing line that appears when drawing gestures. Click the Pick Color button and use the displayed palette to choose a colour before clicking OK. Beneath the Pick Color button you can configure additional line settings. Width and Opacity settings can be used to adjust the thickness and transparency level of the line while the figure in Min Segment Length field defines how long a line must be drawn before Strokes Plus recognises it to be a gesture.
- In The Advanced/Experimental* Options section to the right the Match Probability setting can be changed to adjust how strictly Strokes Plus checks the shape of the gestures you draw the higher the number, the more precise you need to be, so try lowering the value if you are having problems. Ticking Capture Modifiers on Stroke Button Down means that modifier keys can be pressed either before or after drawing a gesture to trigger a different action.
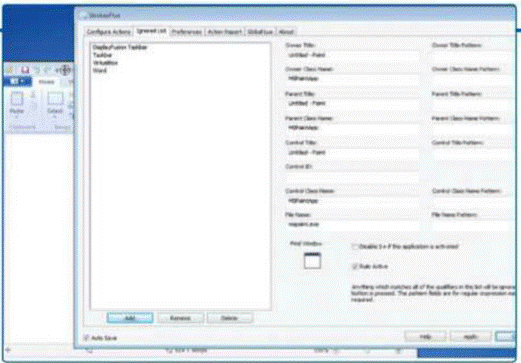
- In Some Instances, it might be better to disable Strokes Plus entirely albeit still temporarily. For example, in an image-editing program, it is possible that you might draw the shape of a gesture when performing some other unrelated task. To fix this, click the Ignored List tab of the Strokes Plus window, or right-click the Notification Area icon and select Ignored List. Click the Add button to the lower left, enter a name and click OK, and then type the name of the program executable in the File Name box before clicking Apply.
- Another Option Is To make use of the Find Window crosshair. This can be used to select a standard program, or a particular area within a program that will cause Strokes Plus to be disabled when it is active. Launch the program you want to add to the ignore list and resize the Strokes Plus window so you can see both. Drag the crosshair from the Find Window section onto the other program window and the fields if the Ignored List tab will be filled in for you.

Find Window section onto the other program window and the fields
if the Ignored List tab will be filled in for you.
- In The Previous Strokes Plus workshop we looked at some basic Lua code, and how Lua scripts could be used to automate simple actions. One of the most versatile uses for Strokes Plus is when it is used to mimic key presses, so that you can carry out keyboard actions with gestures. We’re going to adapt the existing Close Program action to launch the Command prompt. To do this, move to the Configure Actions tab and select Close Program from the list to the left.
- Highlight The Existing Lua Script to the lower right and delete it before selecting ascend Keys from the Keyboard Actions section of the Available Actions dropdown menu and then click Insert. Replace the ‘your text here’ part with it r (to have Strokes Plus ‘press’ the Windows key and R, which is the keyboard command for opening the Run dialogue box in Windows). You may find that it is a good idea to introduce a slight delay by preceding this with {DELAY=50}. The same syntax can be used to mimic a range of other keyboard shortcuts other operators include + for Shift, “for Ctrl and % for Alt.
- Select AC delay From The Utility Actions section of the Available Actions menu, click Insert and replace the word ‘ duration’ with 400 to introduce a delay (of 400 milliseconds) to give the Run dialogue box a chance to appear. You can then insert another instance of ascend Keys which can be used to send commands here we’re entering cmd- (notice the tilde symbol on the end, typed on most keyboards by holding down Shift and tapping #) to send the letters cmd to the dialogue before pressing the Enter key (represented by tilde). You can use the same series of commands to mimic keyboard shortcuts and send key presses to any program.
- A Very Similar Piece Of script could be used to create gestures to add common text to documents, such as your address to a letter. Remember to add a tilde (-) to the end of a line and, once you have entered the relevant code, click Apply to save the changes. In the example code in the screenshot, we’ve configured the action to enter an address, select all the text (“a for Control and A) and then justify it to the right (“r for Control and R). This powerful script can be adapted in countless ways.


