If you are working with other desktop applications—especially from the Microsoft Office suite—the easiest way to transport a Visio graphic to another document is to copy and paste.
If the copy-and-paste approach doesn’t work, or you need to upload a file to a blog or to Facebook, for example, you can try exporting to a file.
Exporting from Visio generally follows this flow:
|
1.
|
Choose what to export. As mentioned, only selected shapes are exported. If no shapes are selected, the whole page, including backgrounds and titles, is exported. Most of the formats handle only one selection or page at a time, but PDF, XPS, and Web Page handle multiple pages. |
|
2.
|
Choose a format in the File, Save As dialog, or via File, Save & Send, Change File Type. |
|
3.
|
Depending on the target format you select, watch for options at the bottom of the Save As dialog. |
|
4.
|
|
|
5.
|
Before the file is created, you might see an options dialog. For example, the image formats enable you to choose a background color, color depth, dots-per-inch resolution, and a few other settings. Choose your options and then click OK. |
|
6.
|
Your exported file gets created. |
|
Exporting to PDF or XPS bucks the trend by not looking at the selected shapes. Instead, all pages are exported by default. If, however, you click the Options button in the Save As dialog, you can specify to export the Selection. |
Saving Bitmapped Images
If you need graphics for a web page or blog entry or to share on your favorite social networking site, images are your best bet.
Bitmapped images are made up of a fixed number of dots, like a photo. If you stretch them, their quality degrades. However, they are generally fine for onscreen purposes.
Supported Image Formats
Visio can export images in BMP, GIF, JPG, PNG, and TIF formats. These days, JPG and PNG seem to be the most common. When you want to export, be aware that the type description and file extension don’t always match, which can make it tricky to find what you’re looking for. For example, you might be looking to export Visio graphics as a bitmap or BMP file. But this file type is listed way at the bottom under Windows Bitmap (*.bmp, *.dib).
GIF and PNG images are interesting because they support transparent backgrounds.
JPG images enable you to control the amount of compression. More compression means smaller files, but a lower quality image. In some cases, the decrease in quality is negligible and is worth the space savings.
BMP is a raw format that produces large files but doesn’t throw out any detail in the name of smaller file size.
Image Output Options
When you are exporting Visio graphics to image formats, an Output Options screen appears immediately after you finish with the Save As dialog. This enables you to fine-tune your exported image. Figure 1 shows the options for PNG export.
Figure 1. The PNG Output Options screen gives you control over how your Visio graphics are exported. Option screens for JPG, GIF, and BMP are similar.
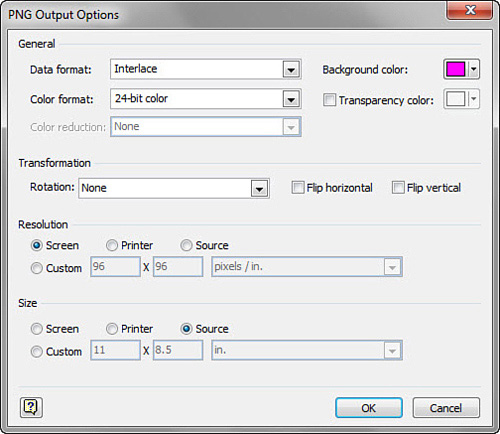
The settings you are most likely to tweak are Background Color, Transparency Color, and Resolution.
Exported images are always rectangular. Any blank space between shapes is filled with a background color, which is white by default.
Say your blog has a magenta background color (shudder!). If you export an image using the default settings, you get a rectangular image with a white background. This sticks out loudly on your magenta web page. If you choose a background color of magenta, your image blends nicely with your blog’s color scheme.
Alternatively, you can draw a magenta rectangle in Visio, place it behind the shapes that you want to export, and include this rectangle in the export. Because no empty space exists between your shapes, the background color setting becomes meaningless but the end result is the same.
If you export to PNG or GIF, you can also select a transparency color. Say your blog’s background has a gradient fill. In this case, any background color chosen during export still shows up as an ugly block, because the blog’s background isn’t uniform, but the image’s background is. If you choose a transparency color, your exported image can appear borderless and nonrectangular.
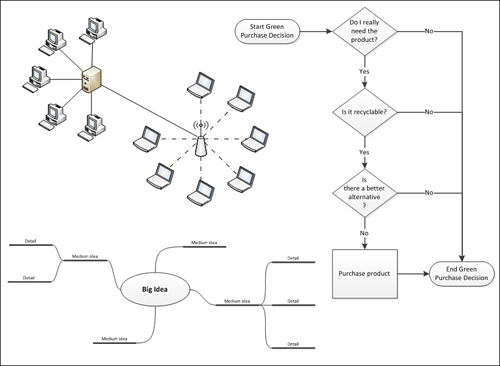
Figure 2 shows two PNG images against a complex background (exported from Visio, then reimported as images.) The image on the left used a transparent color of white. The background nicely shows through, but dithering has muddied the shape edges and the Yes/No text. Close, but not perfect.
Figure 2. Two images on top of a complex background. The image on the left was exported with white as the transparent color. The image on the right used white as the background color.
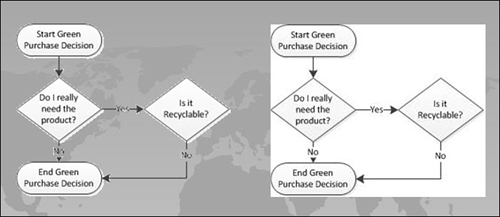
The image on the right used white as the background color. The image is clearer, but the stark white block is rather alarming and doesn’t blend well with the background at all.
For onscreen applications such as presentations and web pages, Screen resolution is usually sufficient. If you need high quality that matches the resolution of your printer, however, check the Printer button under Resolution, or select Custom and enter a high number such as 600 × 600 or 1200 × 1200.
Saving to Vector Formats
If you want to use Visio graphics in another vector-editing program such as an illustration or CAD application, you can first try to copy and paste. If that doesn’t work, try exporting the file to one of the three vector-based formats that Visio supports.
In the Save As dialog, there are seven items, but they add up to three basic types: SVG files, AutoCAD files, and metafiles. Here are the options:
-
Scalable Vector Graphics (*.svg)
-
Scalable Vector Graphics—Compressed (*.svgz)
-
AutoCAD Drawing (*.dwg)
-
AutoCAD Interchange (*.dxf)
-
Compressed Enhanced Metafile (*.emz)
-
Enhanced Metafile (*.emf)
-
Windows Metafile (*.wmf)
Exporting to vector files is similar to how you export to image formats. Selected shapes are exported, or the whole page is exported if no shapes are selected. Multipage documents are not exported as with PDF and XPS, however. Also, you won’t see any options dialogs with these vector formats, since vector data is resolution-independent and background colors don’t apply.
SVG is an XML-based standard that has been around since 1999 and has a following that spans many computing platforms. Visio does not support SVG 100% because SVG can do some things that Visio can’t, so be on the lookout for the occasional oddity. If you are exchanging graphics with your art department, and the staff uses Adobe Illustrator, SVG is a good route to take.
You can test your SVG export by opening it in a browser. A quick test on my machine reveals that IE9, FireFox 3.6, and Chrome 8 can display SVG files. IE8 doesn’t support it directly, but there is a discontinued plug-in from Adobe, available here: http://www.ieaddons.com/en/details/Time_Savers/Adobe_SVG_Viewer/
Architects and engineers use AutoCAD to create precise 2D and 3D technical drawings. It has been around since 1982. A classic workflow goes like this: A technical department creates a floorplan in AutoCAD and then sends it to the facilities management people. Using Visio, they add equipment, furniture, cubicle walls, and the like and then re-export to AutoCAD format and send it back to the technical guys.
You heard about metafiles in the earlier discussion on Paste Special. WMF is an older form of metafile; EMF, the newer. With EMF, exported graphics have higher quality, but some older apps might understand only WMF.
Any format that you can export to can also be imported into Visio. You can import other file types using File, Open. The Open dialog has a drop-down filter that lets you find files of specific types more easily.
Also, the Illustrations group on the Insert tab contains the Picture button. This presents a dialog that is almost identical to the Open dialog.
The primary difference between Open and Insert is that Open creates a new Visio document with the imported graphics, whereas Insert drops the file into the current drawing.