You have to feel sorry for Windows Media Player (WMP), because it’s usually one of the first applications to get replaced by something better, faster and generally more modern. Indeed, Windows Media Player does get something of a bad press, but it’s actually not that bad as a standard video player, but where it really shines is as a music player.
Over the next couple of pages, we’ll be having a little look at what tricks, tips and tweaks can be applied to Microsoft’s mighty musical media monstrosity.
Internet radio
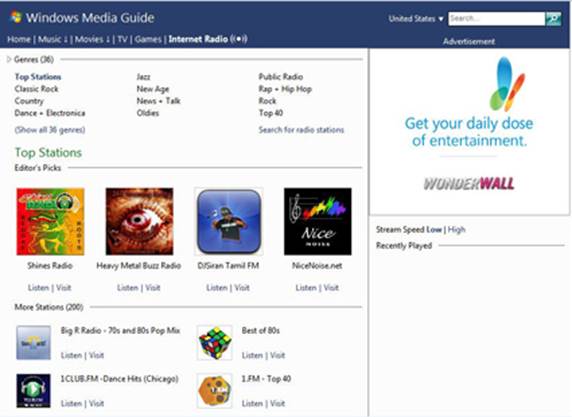
Internet radio is very cool and easy to listen to in WMP
If for some reason you’re a little bored of your vast collection of music, why not try out a selection of radio stations available via the internet. To listen to these via Windows Media Player, do the following:
- Open WMP
- Click on the ‘Media Guide’ button in the bottom left of the screen. Don’t worry if it doesn’t say ‘Media Guide’; just click on the down arrow next to the wording, then choose ‘Media Guide’ from the list.
- You might get a message in the main windows saying something like, ‘The requested page cannot be found: www.windowsmedia.com.’ Don’t worry, just click on the hyperlink and you’ll be redirected, within WMP, to the correct page.
- Click on the link in the top right, ‘Internet Radio.’
- Choose from the vast array of genres, top picks and so on.
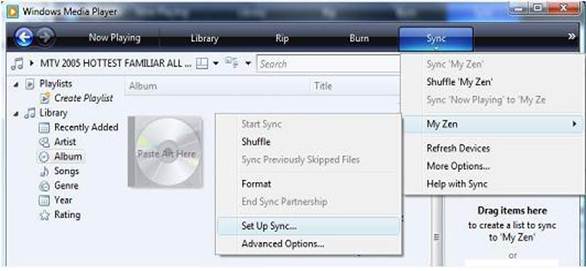
Make an ipod work with WMP
Apples don’t want to work with oranges, or so it would seem. If you’re the proud owner of an iPod, then iTunes, and a few others, are you’re only choice of syncing applications that will work with Windows and the device. However, some clever coders have created a WMP plug-in that will talk to iPods. You’ll have to pay for it, but it does come with a 30-day free trial. All you need to do is head to bit.ly/IVtRPa and download the software, then install it and plug in your iPod. Hey presto; WMP can now sync and talk to your iPod!
Make an ipod work with WMP
Once the software is installed, and WMP has been opened, plug in the iPod. Go to the Sync tab in the Library view. Drag and drop the music you want to have on your iPod.
Click on the ‘Start Sync’ icon, above the iPod image, to complete the sync.
Using automatic sync
you can autosync whenever the device is next plugged in
If you use an MP3 player often, and you’re forever syncing new music manually across your collection and the device in question, then you’re doing something very wrong, because you can autosync whenever the device is next plugged in:
- Open WMP and plug in your MP3 player.
- Go to the Sync tab and make sure WMP has picked up the device and it’s functioning.
- Click on the drop-down menu, under the title of tab, and choose ‘Setup Sync’.
- Click on the tick box titled, ‘Sync this device automatically’.
- Choose from the available playlists, or create a ‘New Auto Playlist’ by clicking on the button at the bottom of the screen.
- Be warned though, if you have a large collection of music and media, the wrong click of a button can begin syncing everything across to your device.
WMP enhancements
Windows Media Player 12 has been designed to replicate many of the features you would expect to see on a traditional home stereo, complete with a mixer, equaliser and other audio tweaking devices. The software equivalent of the myriad of knobs and sliders you’d see on high-end stereo equipment are known as playback enhancements in Windows Media Player, and they’re even easier to use than their physical counterparts. Using the built-in playback enhancements for Windows Media Player, you can adjust and optimise audio and video on the fly to best suit your situation, speaker system and tastes.
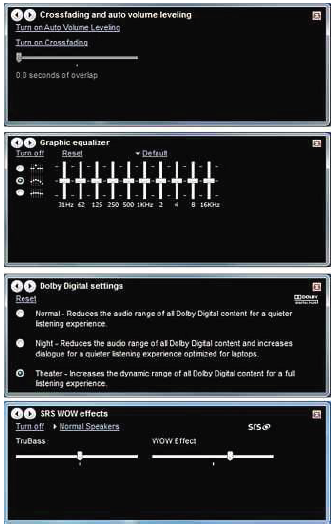
Some of the extra enhancements you can make to your listening experience.
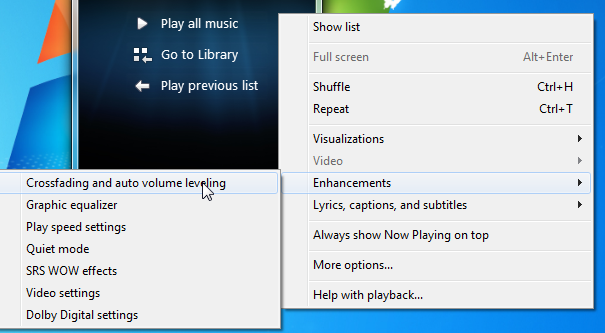
To access playback enhancements, you must be in the ‘Now Playing Mode’. Click the icon in the bottom-right of the Player Library to switch to ‘Now Playing Mode’. Right-click anywhere in the Now Playing window and choose ‘Enhancements’ to see the list of available playback enhancements.
A brief handful of these enhancements are:
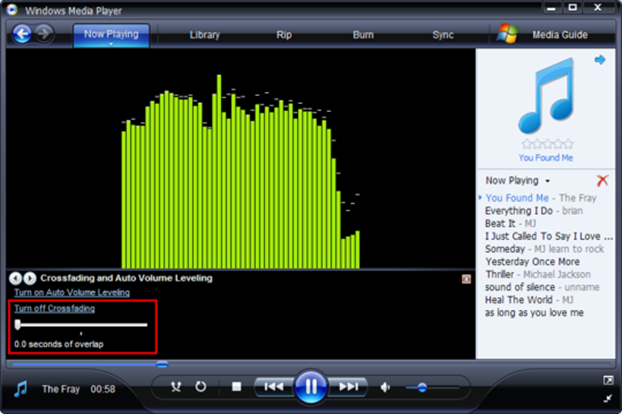
Crossfading
In the Crossfading and auto volume levelling window, click ‘Turn on Crossfading’ to have Windows Media Player gradually fade out the song at the end and then have the next song on the playlist gradually fade in. Move the slider to the left to shorten the overlap between songs. Move the slider to the right to lengthen the overlap.
Crossfading
Auto volume levelling
In the ‘Crossfading and auto volume levelling’ window, click ‘Turn on Auto volume levelling’ so that Windows Media Player automatically adjusts the volume level between songs to make them more similar. Windows Media Player does so by analysing the song during playback, and then adding the auto volume levelling information after the song has played all the way through. Clever, innit?
In the ‘Crossfading and auto volume levelling’ window, click ‘Turn on Auto volume levelling’ so that Windows Media Player automatically adjusts the volume level between songs to make them more similar.
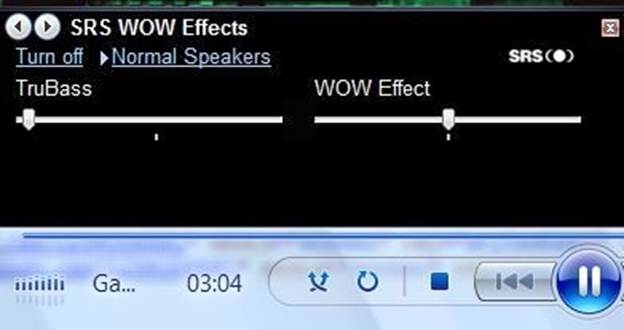
SRS Wow Effects
These allow you to enhance the lowfrequency bass and stereo sound performance (i.e. panning between left and right channels). The options here are pretty straightforward.
Move the TruBass slider to the left to reduce the low-frequency effect, and move it to the right to boost the low-frequency sounds.
SRS Wow Effects
Move the WOW Effect slider to the left to decrease the stereo sound performance and move it to the right to increase it. This enhancement creates more of a surround sound kind of effect.
You can have SRS Wow optimised for your speaker type by clicking the text in the top-left with the arrow next to it. Choose from normal speakers, headphones or large speakers.
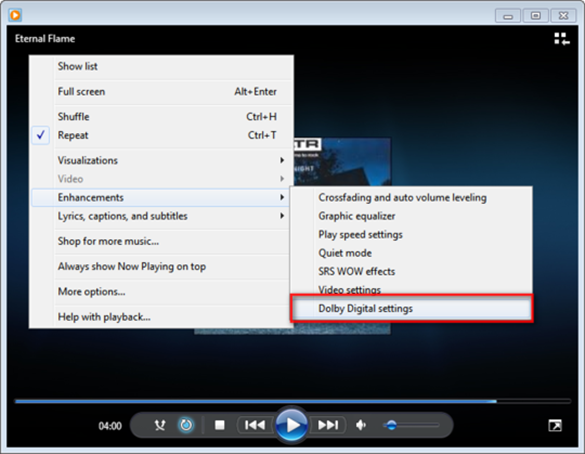
Dolby Digital Settings
These settings are similar to the speaker type setting in the SRS Wow effects. However, these settings only affect Dolby Digital content, which is great for remastered music or live bands. Within this menu you can choose from three different presets:
- Normal: Reduces entire range of Dolby Digital for quieter playback.
- Night: Boosts dialogue while toning down other sounds. Good for laptops.
- Theatre: Increases dynamic range of all sounds for more dramatic differences between soft and loud sounds and a fuller listening experience.
Dolby Digital Settings
It’s down to what works best with the type of music you’re listening to and your stereo/PC setup.
Top WMP Plug-ins
Plug-ins add and enhance an otherwise standard bit of software. Here are some of our favourite WMP plug-ins:
- Lyrics Plug-in (bit.ly/IUqhGd): Now you can see what Bob Dylan was actually singing.
- Last.fm Scrobbler (bit.ly/JDF3lL): Add the music you listen to into your Last.fm profile.
- WMPKeys (bit.ly/L2TwW8): Edit those shortcut keys for WMP.
- DFX Audio Enhancer (bit.ly/L6cMrW): Tweak your sound settings even further.
| Keyboard Shortcuts | |
| Alt+1 | Video size 50% |
| Alt+2 | Video size 100% |
| Alt+3 | Video size 200% |
| Alt+Enter | Toggle display for full-screen video |
| Ctrl+1 | Switch to Player Library |
| Ctrl+2 | Switch to skin mode |
| Ctrl+3 | Switch to Now Playing mode |
| Ctrl+7 | Add to playlist |
| Ctrl+8 | Add to burn list |
| Ctrl+9 | Add to sync list |
| Ctrl+B | Previous (item or chapter) |
| Ctrl+F | Next (item or chapter) |
| Ctrl+H | Turn shuffle on or off |
| Ctrl+J | Eject CD or DVD (this doesn’t work on computers equipped with two or more CD or DVD disc drives) |
| Ctrl+M | In the Player Library, show or hide the menu bar |
| Ctrl+N | Create a new playlist |
| Ctrl+Shift+B | Restart video |
| F4 | Switch the view of items In the details pane |
| Shift+F10 | Show shortcut menu |


