Do you remember the last time you were sitting in a hotel room trying to make a remote connection to your corporate or home network? Windows 7 has eased the pain of making remote connections to your network by offering much greater flexibility in the ability to network. Windows 7 also offers many updated security measures to protect your data when connecting to remote networks or when gaining access to your critical data on an unsecured network.
Windows 7 allows you to make VPN connections, dial-up connections, wireless connections, and broadband connections. When working with the network features of your computer, you need to start with the Network and Sharing Center. You can easily access the Network and Sharing Center by following these steps:
-
Click Start→Control Panel.
-
In the Control Panel, click Network and Internet→Network and Sharing Center. This opens the Network and Sharing Center, shown in Figure 1.
Figure 1. Viewing your network and sharing settings
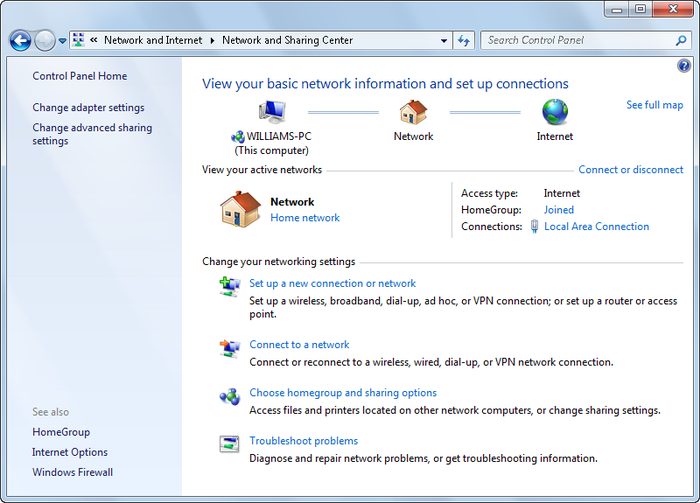
After you have opened the Network and Sharing Center, you can use the console to manage your network settings, view your network status, and get an overview of your networking configuration. The left pane of the console offers you different tasks to choose from when managing your network features.
Your choices are:
-
Manage wireless networks
NOTE
The wireless networks option is only available if your computer has a configured wireless adapter.
-
Change adapter settings
-
Change advanced sharing settings
-
HomeGroup
-
Internet Options
-
Windows Firewall
The Network and Sharing Center houses the main features for managing your computer’s networking capabilities. When you need to create, connect, or manage your network, this console offers you the ability to handle all of the management aspects available in Windows 7.
You can set the properties of your current network by following these steps:
-
Click Start→Control Panel.
Windows automatically applies the default network settings based on the network location type. The three network location types are:
- Home Network
-
A network for computers that are configured as members of a homegroup and are not connected directly to the public Internet.
- Work Network
-
A network for computers that are connected to the corporate domain to which they are joined or are being used in a workgroup.
- Public Network
-
A network in a public place, such as a coffee shop or airport, rather than for an internal network.
In the Network and Sharing Center, the current network location type is displayed below the network name. You can set the network location type by clicking the current location type and then selecting a location type for the network.
NOTE
Your computer saves settings separately for each network location type. This allows you to specify different networking and sharing settings for each network location. The first time you connect your computer to a network, you’ll see a dialog box that allows you to specify whether you are at home, at work, or in a public location. If Windows 7 is unable to determine the network location, it uses the public network location type. If you join a computer to a domain, the network to which the computer is connected changes to a work network.
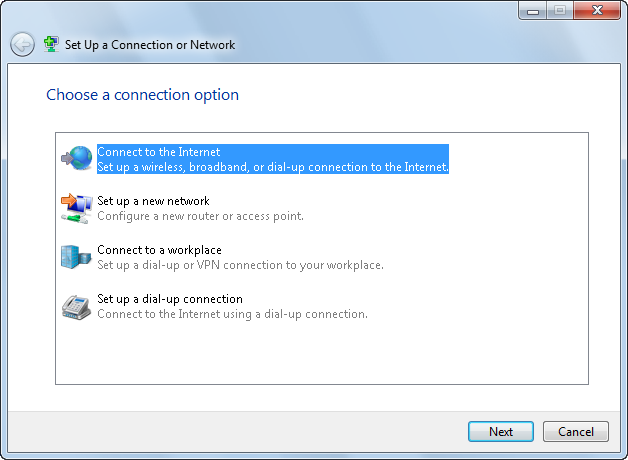
In the Network and Sharing Center, you can create network connections by clicking “Set up a new connection or network” link. This opens the Set Up a Connection or Network Wizard, shown in Figure 2. You can use this wizard to create connections to the Internet and set up wireless networks and access points, ad hoc wireless networks, dial-up connections, and VPN connections to your workplace.
Figure 2. Setting up a network connection
1. Creating Dial-Up Connections
In the Network and Sharing Center, you can set up a dial-up connection by following these steps:
Figure 3. Setting up a dial-up connection
-
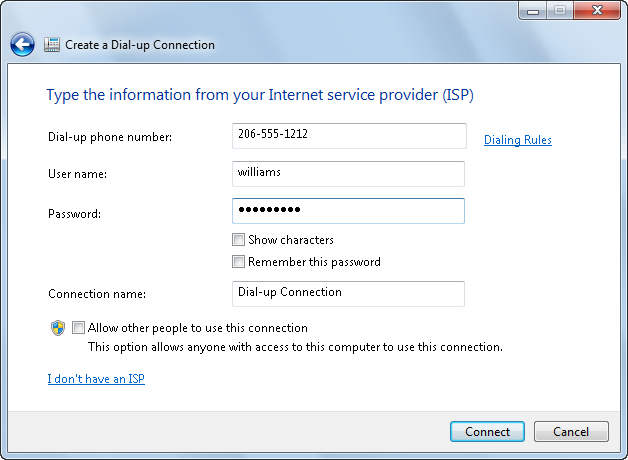
The Create a Dial-up Connection window appears and asks for specific information to configure your dial-up connection. See Figure 3 for an example.
-
As necessary, select the “Show characters” checkbox when you are typing your password to view your entry. This will help eliminate any typing mistakes. Also, uncheck this selection after you confirm the correct spelling of your password to eliminate the possibility of anyone else seeing your password later.
-
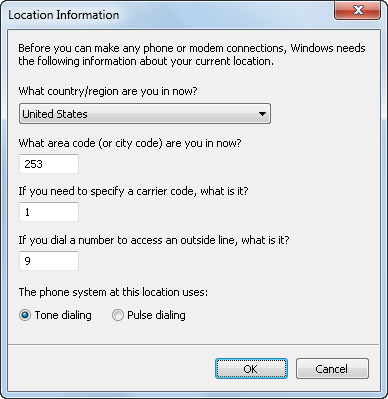
If you haven’t previously set up a dialing location, click the Dialing Rules link. The wizard will prompt you to provide the specific location information for your connection, as seen in Figure 4. When prompted, enter your country/region, area code, carrier code, and dial-out number as necessary. Click “Tone dialing” or “Pulse dialing” to identify your phone type. Windows 7 saves this information into a dialing rule location named My Location for future use. See the next section for more information on Dialing Rules configuration.
Figure 4. Configuring your location information
1.1. Setting a connection to use dialing rules
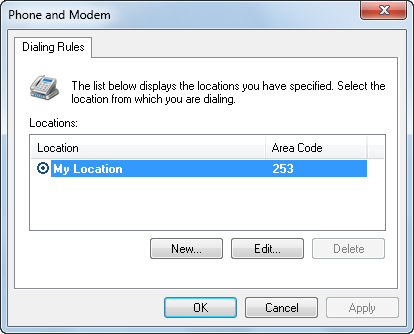
Dialing Rules, as seen in Figure 5, offers you the ability to control how your dial-up connections function in defined locations. These rules apply to outgoing phone calls from your modem. When you specify the phone number to dial, the dialing location determines whether the area code applies to the current call, and whether a calling card applies. To configure Dialing Rules, you must open the Phone and Modem Options dialog box.
Figure 5. Configuring phone and modem options
To open the Phone and Modem Options dialog box, use the following steps:
-
Click Start→Control Panel.
-
Click Phone and Modem.
If you have never opened the Phone and Modem Options dialog box, you will have to provide the default location information for your connections. When prompted, enter your area code, country/region, carrier code, and dial-out number, if you have one. Click “Tone dialing” or “Pulse dialing” to identify your phone type.
To configure Dialing Rules for your connection, use the following steps:
The General tab contains the basic information about your dialing rule. You have six areas to enter information that aids and defines aspects of your rule. See Table 1 for a detailed list of the areas covered.
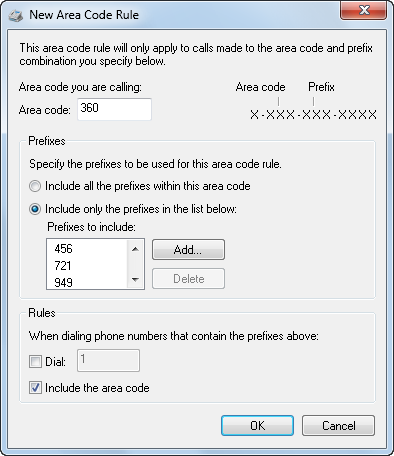
The Area Code Rules tab provides options for creating and managing area code rules. These rules determine how phone numbers are dialed from your current area code to different area codes. These settings also determine how numbers are dialed within your current area code. To create a new area code rule, follow these steps:
Figure 6. Creating a new area code rule
-
Click New. This displays the New Area Code Rule dialog box shown in Figure 6.
-
Use the Prefixes options to set the desired prefixes to use in the current area code rule. You can specify to use all of the prefixes or you can enter specific prefixes:
-
To use all prefixes, select the “Include all the prefixes within this area code” option.
-
To specify prefixes to use with this rule, select the “Include only the prefixes in the list below” option and then click Add. In the Add Prefix dialog box, enter one or more prefixes separated by commas or spaces, and then click OK.
-
When gaining access to the Internet, you may want to use a calling card for long-distance expenses. Windows 7 supports the use of calling cards within the dialing rules associated with your dial-up connection. The Calling Card tab, as shown in Figure 7, allows you to enter information about a predefined calling card you use. Windows 7 supplies a prepopulated list of common calling cards. If you cannot find your calling card company, you can create a new entry for it.
Figure 7. Selecting a calling card to use
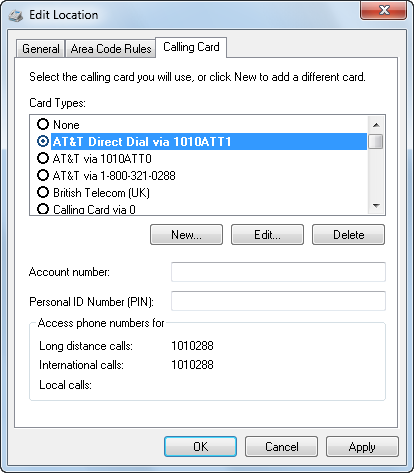
To create a new calling card entry, click New, and the New Calling Card window appears. There are four tabs with which to define your new calling card. The four tabs are listed in Table 2.
1.2. Configuring dial-up connection properties
When connecting using a dial-up connection, you may need to configure additional options for your connection. Windows 7 enables you to change the properties of your dial-up connection to alter your phone numbers, manage redial attempts, and manage your personal security settings. You can also configure the network protocol options and network sharing options.
To change the properties of your network connection, you need to open the Network Connections window and the Dial-up Connection Properties dialog box by following these steps:
-
Click Start→Control Panel.
The Dial-up Properties window gives you five tabs of features to configure. The different tabs are labeled General, Options, Security, Networking, and Sharing. Each tab enables you to manage the different features available for use with your modem and dial-up connections. Table 3 shows the different tabs available and the features you can manage through the Dial-up Properties window.
| Tab | Related options |
|---|---|
| General | Modem device configuration
Phone number to dial Alternative phone numbers to dial Associate dialing rules with this dial-up connection |
| Options | Dialing options
Redialing options PPP settings |
| Security | Data encryption
Authentication Interactive logon and scripting options |
| Networking | Internet Protocol version 6 (TCP/IPv6)
Internet Protocol version 4 (TCP/IPv4) File and Printer Sharing for Microsoft Networks Client for Microsoft Networks |
| Sharing | Internet Connection Sharing |
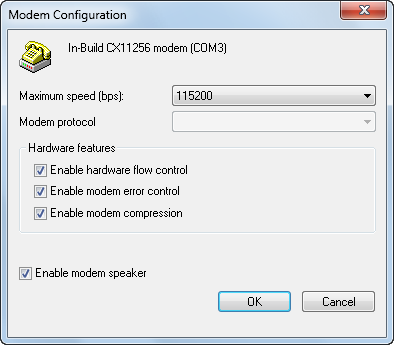
The General tab of the Dial-up Properties dialog box allows you to manage the device configuration of your modem by clicking the Configure button. See Figure 8 for an example. The Modem Configuration dialog box that appears allows you to change the maximum transfer speed of your modem and the hardware features available for your modem. Using the “Hardware features” options, you can turn a feature on or off by checking the associated checkbox for each feature listed:
-
Enable hardware flow control
-
Enable modem error control
-
Enable modem compression
-
Enable modem speaker
Figure 8. Optimizing the modem configuration
From the General tab, you can also edit the phone number to dial for calls. Editing the “Phone number” field allows you to change the stored phone number to dial. If you have multiple numbers to choose from through your service provider or VPN provider, you can add these phone numbers using the Alternates button. Clicking the Alternates button provides you with the ability to add new numbers, change their dialing priority, and use error checking to go to the next number in the list.
The Options tab allows you to configure the dialing options available for your dial-up connection. You can have Windows 7 display progress while connecting by checking the box next to this feature. You can have Windows prompt for a name and password, certificate, and so on, by checking the box for this feature. You can also turn on the “Include Windows logon domain” feature by checking its associated checkbox, and the “Prompt for phone number” feature, which opens a dialog box for you to fill in the appropriate phone number to dial. See Figure 9 for an example of the Options tab.
Figure 9. Configuring additional modem options
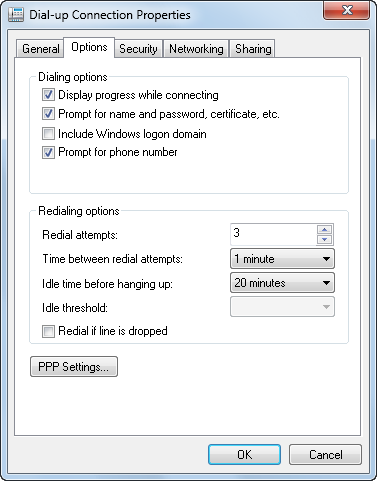
The Options tab also allows you to configure the options used to redial a connection. Use the “Redial attempts” text box to set the number of attempts Windows 7 makes to dial a connection. You can also use the “Time between redial attempts” listbox to change the behavior Windows 7 uses between call attempts. Setting the “Idle time before hanging up” feature allows you to turn off a connection automatically when you are no longer using the connection for active data transfers on the network. This feature can save you money if you are using a calling card or if long-distance charges apply to your dial-up connection.
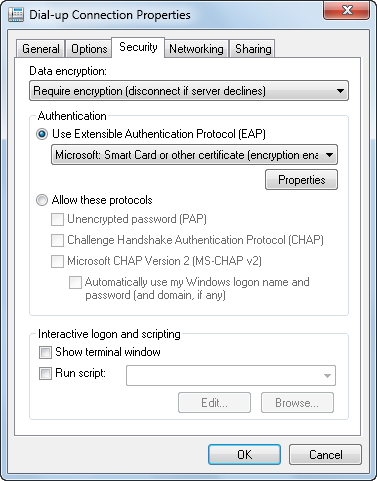
As Figure 10 shows, default settings on the Security tab allow you to validate your identity with secured and unsecured password use. With a secured password, you can specify whether you want to use your Windows logon name and password automatically and whether data encryption is required.
Figure 10. Configuring dial-up security

If the default settings don’t meet your needs, you can configure data encryption and authentication. With data encryption, you can require encryption or specify that maximum encryption must be used. With authentication, you can choose to use the Extensible Authentication Protocol (EAP) in one of several modes, including Protected EAP, Secured Password, and Smart Card. See Figure 11 for an example.
Figure 11. Using encryption and authentication
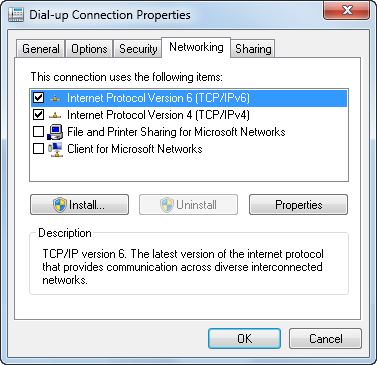
As shown in Figure 12, the Networking tab gives you the ability to configure the protocols associated with your dial-up connection. You can enable or disable a protocol by checking its associated checkbox. To configure the individual protocol properties, you may either double-click the desired protocol or highlight the protocol and choose the Properties button to open the dialog box associated with its properties. By default, dial-up connections have file and printer sharing as well as Client for Microsoft Networks disabled. If you are connecting directly to your workplace using dial-up, you’ll need to enable Client for Microsoft Networks to connect to servers and printers on the work network (File and Printer Sharing will allow people to connect to resources on your computer).
Figure 12. Configuring the networking protocols to use with the dial-up connection
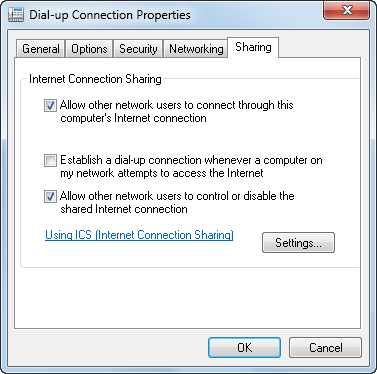
The Sharing tab allows you to configure the Internet Connection Sharing feature of Windows 7, as seen in Figure 13. To enable this feature, check the associated box. This will allow other users to connect to the connection you define from the drop-down menu. You have the option to associate any network connection defined to your system with this feature.
Figure 13. Configuring Internet Connection Sharing as necessary