Desktop gadgets are small applications designed to perform a very specific function, such as providing a desktop calendar or virtual notepad. Unlike in Windows Vista, you add gadgets directly to the desktop and no longer need a separate sidebar.
1. Getting to Know Your Computer’s Gadgets
Windows has several default gadgets in most installations. You add gadgets to the desktop using the Gadget Gallery dialog box, shown in Figure 1. To access this dialog box, click Programs in Control Panel and then click Desktop Gadgets. Alternatively, click Start, point to All Programs, and then click Desktop Gadget Gallery.
Figure 1. Working with your computer’s gadgets
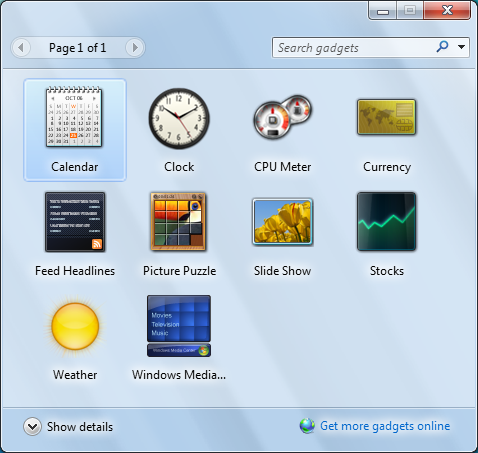
The Gadget Gallery shows all the gadgets that are available on your computer. When multiple pages of gadgets are available, you can navigate the pages using the Previous and Next Page buttons provided in the upper-left corner of the window. You can also use the Search box to search for gadgets by name. As you type your search text, the list of gadgets is automatically filtered to include only those gadgets matching the search text you entered.
In the lower-left corner of the Gadget Gallery window, you’ll find a Show details/Hide details button used to show or hide a Details pane. Clicking a gadget with the Show Details pane expanded displays the gadget details, which include the gadget name, version, and description. Clicking and dragging a gadget moves it to the desktop. Or, you can double-click the gadget to add it to the right-side of the desktop.
You can visit Microsoft’s Gadget Gallery on the Internet by clicking either of the links provided. Some gadgets are updated automatically when new versions become available as part of the standard Windows Update process. Other gadgets you must update manually by downloading the desired gadget update.
You can work with gadgets in a variety of ways. You can move them around the desktop by clicking and dragging to move it to different locations on the desktop. You can display a gadget on top of all other windows by right-clicking the gadget and selecting Always on Top. Once you’ve moved the gadget to the top, right-clicking the gadget and selecting Always on Top a second time clears the setting and makes the gadget work like any other window—it can be brought to the front when in use or put to the back when not in use.
Every gadget has an opacity setting that controls whether you can see through it. Because the default opacity setting is 100 percent, you can’t see through gadgets by default. If you want to be able to see through a gadget, right-click it, point to Opacity, and then select the desired opacity. The lower the opacity setting is, the more translucent the gadget will appear to be and the better you’ll be able to see what’s behind it. The higher the opacity setting is, the less translucent the gadget will appear to be and the less you’ll be able to see what’s behind it.
Now let’s take a closer look at the gadgets you’ll probably use the most.
NOTE
The Feed Headlines gadget displays data from selected Really Simple Syndication (RSS) feeds that have been configured in Internet Explorer. RSS feeds can contain news headlines, lists, and other information.
1.1. Using the Calendar gadget
Anyone who likes to keep a calendar on his or her desk to show the day of the week and day of the month will love the Calendar gadget. This gadget displays a desktop calendar that you can drag around the desktop.
You can work with the gadget in a variety of ways. As the leftmost view in Figure 2 shows, the current day and date are displayed by default. If you click the calendar, you can view the current month. You can view other months in the calendar using the right-facing and left-facing arrow buttons.
Figure 2. Navigating the Calendar gadget views

To display the day and date view for a particular entry, click it. The tab in the lower-left corner and the color of the view indicate that you are not viewing the current day and date. You can return to the current day and date view by clicking the tab in the lower-left corner of the calendar.
1.2. Using the Clock gadget
Anyone who likes wall clocks or dislikes the bland system clock will like the Clock gadget. This gadget displays an analog clock with hour and minute hands by default (see Figure 3). Moving the mouse pointer over the clock and clicking shows the digital time with hour, minutes, and seconds.
Figure 3. Working with the Clock gadget
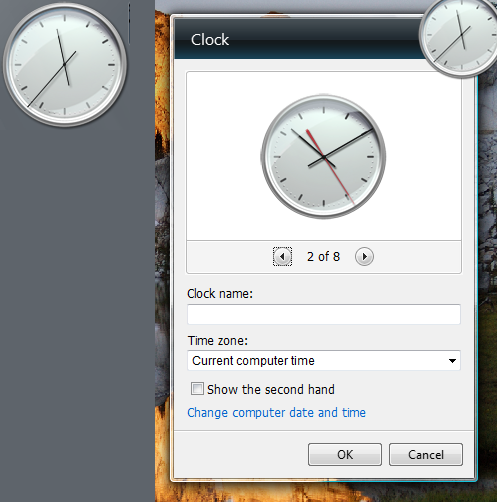
The Clock gadget is one of several gadgets that have configurable properties:
-
You can change the clock face to any one of the eight standard clock faces.
-
The clock time zone you use can be different from that used by the computer clock.
-
The clock can have a name, which is useful if you add more than one instance of the Clock gadget (which is handy if you want to see the time in multiple time zones simultaneously).
-
The clock can have a second hand, though its movement can be rather distracting.
To change the time zone or modify other options, right-click the Clock gadget and then select Options. You can then use the dialog box shown in Figure 2-18 to set the clock options.
1.3. Using the CPU Meter gadget
Having problems with a slow or unresponsive computer, or like being able to see what’s going on with your computer? If so, you might want to start using the CPU Meter gadget. This gadget displays the current percentage utilization of the computer’s CPU and memory as a series of gauges (see Figure 4). The large gauge shows the CPU utilization; the small gauge shows the RAM utilization.
Figure 4. Working with the CPU Meter gadget
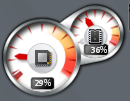
Similar to a tachometer in a car, the CPU and RAM gauges show high utilization in yellow and red. The gauges are handy if you are experiencing performance problems and are wondering what is happening with your computer.
Generally, if either gauge peaks into yellow or red usage, the computer may become sluggish and slow to respond because of the high utilization of its resources. If both gauges peak into yellow or red usage, or either gauge is at 98 percent utilization or higher, your computer may become extremely sluggish or unresponsive to your requests.
1.4. Using the Weather gadget
Anyone stuck in a cubicle without a window or wanting to know about the weather in some far-off place will like the Weather gadget. This gadget provides an overview of the weather at a particular location courtesy of the weather provider configured for your computer. The default weather provider is MSN. Using this gadget, you can tell at a glance whether it is sunny, cloudy, snowing, or raining (see Figure 5). You can also see the outside temperature.
Figure 5. Using the Weather gadget
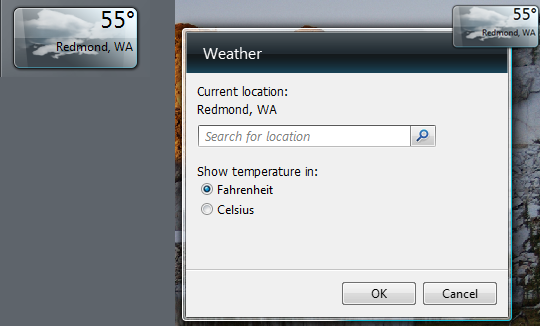
You can work with the gadget in several ways. You can set the location for which you want to view the weather, which is great if you are currently in Ohio but your heart and mind are in Colorado, where you’re heading for vacation. You can also specify whether to display the temperature in degrees Fahrenheit or degrees Celsius.
To change the location of your weather reports or the way temperature is displayed, right-click the Weather gadget and then select Options. You can then use the dialog box shown in Figure 5 to set the weather options.
1.5. Using the Stock gadget
Anyone who tracks securities, companies, or indexes in the stock market will like the Stock gadget. This gadget provides an overview of the major stock market indexes by default (see Figure 6). In the United States, the major indexes are the Dow Jones Industrial Average ($INDU), the NASDAQ Composite Index ($COMPX), and the S&P 500 Index ($INX). Quotes are provided by the default quote provider with a 20-minute delay. The default quote provider is IDC Comstock.
Figure 6. Navigating the Stock gadget views
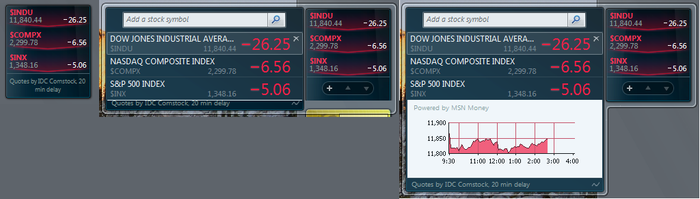
You can work with the Stock gadget in several ways. By default, the Stock gadget displays details on three tracked stocks at a time, in a vertical column. The most recently tracked stocks are listed first. If you move the mouse pointer over the gadget, you’ll see a control panel with several buttons. You can use the Scroll Up and Scroll Down buttons to navigate through the summary details for the stocks you are tracking.
You can change the position of a stock in the list by clicking its entry and dragging it slowly up or down. Using this technique, you can move a tracked stock from the bottom of the list to the top or from the top of the list to the bottom.
If you move the mouse pointer over a stock entry, a delete button is displayed in the upper-right corner. Click the delete button to stop tracking the stock.
All publicly traded securities, companies, and indexes have a stock symbol. If you want to add a security, company, or index, follow these steps:
If you want to view all of your tracked securities, companies, and indexes, move the mouse pointer over the Stock gadget and click the + button. To view a graph of the stock, move the mouse pointer over the stock entry and click. Be careful not to click the stock name, as this opens the stock’s MSN page in Internet Explorer.
1.6. Using the Currency gadget
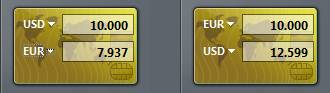
Anyone who converts money from one currency to another will like the Currency gadget. This gadget converts currency using the current market rate, allowing you to see at a glance how much your money is worth in another currency.
The default currency provider for this gadget is MSN Money. The Currency gadget is handy for anyone traveling to a foreign country or working in a country and getting paid in a currency other than the one to which he is accustomed.
As Figure 7 shows, the Currency gadget has two entries. The first entry sets the amount of a specific currency you want to convert and the second entry is the value in the specified currency. Using this feature you can, for example, convert 10 U.S. dollars into euros or 10 euros into U.S. dollars.
Figure 7. Using the Currency gadget
1.7. Using the Slide Show gadget
Users with pictures stored on the computer will like the Slide Show gadget. This gadget displays pictures from a selected folder as a continuous slide show where pictures rotate at a specified interval (see Figure 8).
Figure 8. Working with the Slide Show gadget
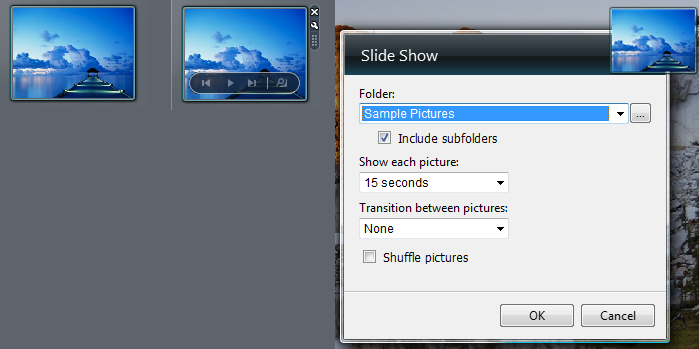
Moving the mouse pointer over the Slide Show gadget displays a control panel that allows you to pause the slide show or play the slide show. You can also navigate to the previous and next pictures using the Previous and Next buttons. The View button opens the currently displayed picture in Windows Live Photo Gallery.
By default, pictures in your Pictures Library are displayed in the slide show. Right-click the Slide Show gadget and select Options, and you can modify the Folder setting to use any preferred folder by following these steps:
-
Click OK.
You can customize the way the slide show works by following these steps:
-
Click OK.