Forward Lookup Zones
A forward lookup zone is created to, as the name suggests, forward lookups to the DNS database. In other words, this type of zone resolves names to IP addresses and resource information. For example, if a user wants to reach dc1.companyabc.com and queries for its IP address through a forward lookup zone, DNS returns 172.16.1.11, the IP address for that resource.
Note
There is nothing to stop the assignment of multiple RRs to a single resource. In fact, this practice is common and useful in many situations. It might be practical to have a server respond to more than one name in specific circumstances. This type of functionality is normally accomplished through the creation of CNAME records, which create aliases for a particular resource.
Reverse Lookup Zones
A reverse lookup zone performs the exact opposite operation as a forward lookup zone. IP addresses are matched up with a common name in a reverse lookup zone. This is similar to knowing a phone number but not knowing the name associated with it. Reverse lookup zones are usually manually created and do not always exist in every implementation. Creating a new zone using the Configure a DNS Server Wizard, can automatically create a reverse lookup zone. Reverse lookup zones are primarily populated with PTR records, which serve to point the reverse lookup query to the appropriate name.
Primary Zones
In traditional (non-Active Directory-integrated) DNS, a single server serves as the master DNS server for a zone, and all changes made to that particular zone are done on that particular server. A single DNS server can host multiple zones, and can be primary for one and secondary for another. If a zone is primary, however, all requested changes for that particular zone must be performed on the server that holds the master copy of the zone.
Secondary Zones
A secondary zone is established to provide redundancy and load balancing for the primary zone. Each copy of the DNS database is read-only, however, because all record keeping is done on the primary zone copy. A single DNS server can contain several zones that are primary and several that are secondary. The zone-creation process is similar to the one outlined in the preceding section on primary zones, but with the difference being that the zone is transferred from an existing primary server.
Stub Zones
The concept of stub zones is unique to Microsoft DNS. A stub zone is essentially a zone that contains no information about the members in a domain but simply serves to forward queries to a list of designated name servers for different domains. A stub zone subsequently contains only NS, SOA, and glue records. Glue records are essentially A records that work in conjunction with a particular NS record to resolve the IP address of a particular name server. A server that hosts a stub zone for a namespace is not authoritative for that zone.
As shown in Figure 1, the stub zone effectively serves as a placeholder for a zone that is authoritative on another server. It allows a server to forward queries that are made to a specific zone to the list of name servers in that zone.
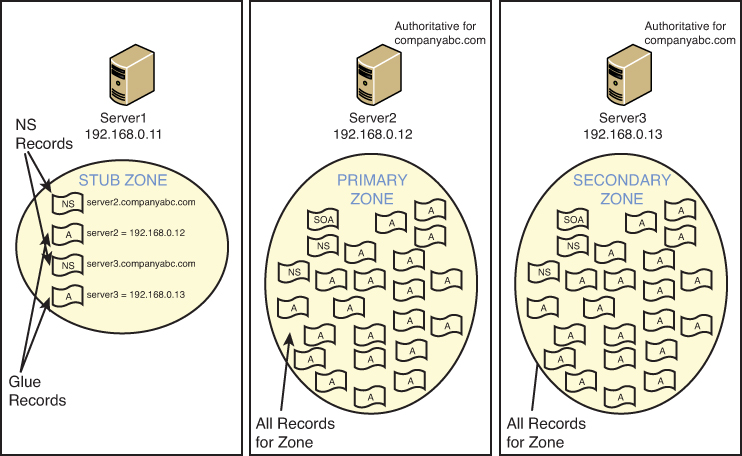
Figure 1. Stub zones.
You can easily create a stub zone in Windows Server 2012 after the need has been established for this particular type of functionality. To create a stub zone, follow these steps:
1. Launch Server Manager from a Windows 2012 server with a full GUI.
2. Select the DNS section. The list of servers in the server pool with the DNS role installed will be shown.
3. Right-click the DNS server to configure and select DNS Manager.
4. Select the DNS server name to configure.
5. Select the Forward Lookup Zones node.
6. Select Action, New Zone.
7. Click Next on the Welcome page.
8. Select Stub Zone from the list of zone types. Because this zone will not be AD integrated, uncheck the Store the Zone in Active Directory check box if it is checked, and then click Next to continue.
9. Type in the name of the zone that will be created, and click Next to continue.
10. Select Create a New File with This File Name and accept the defaults, unless migrating from an existing zone file. Then click Next to continue.
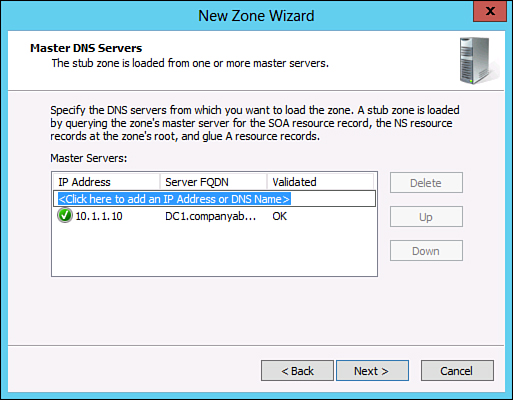
11. Type in the IP address of the server or servers from which the zone records will be copied. Press Enter for each server entered, and they will be validated, as shown in Figure 2. Click Next to continue.
7.2.12
Figure 2. Entering stub master servers.
12. Click Finish on the Summary page to create the zone.
The newly created stub zone will hold only the SOA, NS, and glue records for the domain at which it is pointed.


