Feeling overwhelmed by the new Floor 11 in Genshin Impact 4.4 Spiral Abyss? Fear not, Travelers! This guide will equip you with the knowledge to dominate this challenging floor and secure those precious Primogems.
How to Complete Spiral Abyss Floor 11 in Genshin Impact
Chamber 1
First Half
This chamber throws waves of Hilichurls and Mitachurls at you. Here’s how to handle them effectively:
- Relax, They’re Predictable: Each wave features three enemies that gather directly around the monolith. No need for fancy Anemo crowd control (CC) here.
- Stand Your Ground: Simply position yourself close to the monolith in each wave. As enemies approach, unleash your attacks and protect the monument.
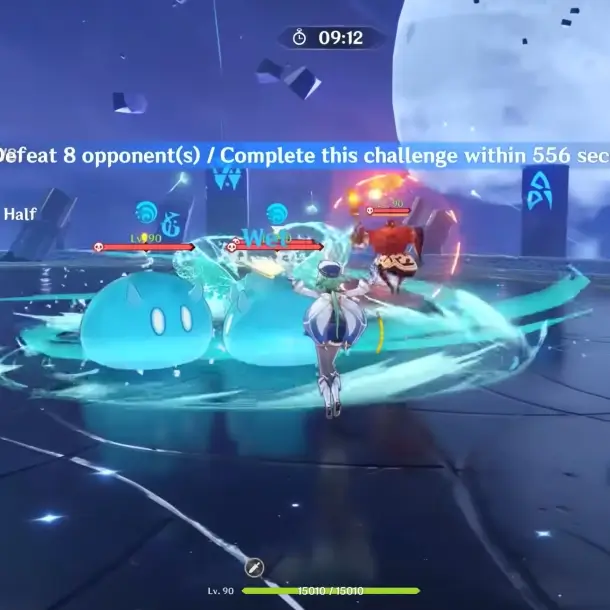
Second Half
The second half throws Slimes your way, with Hydro Slimes targeting the monolith. Here’s how to tackle the slimy situation:
- Anemo Advantage: If you have Anemo characters like Sucrose, Kazuha, or Venti, use their elemental skills or bursts to group all the Slimes together. This allows for easier AoE (Area of Effect) attacks to quickly clear the waves.
- No Anemo? No Problem: Don’t have Anemo CC? Focus on taking down the Slimes one by one, prioritizing those closest to the monolith. Smaller Slimes have lower HP, making them quicker to eliminate.
While referred to as “waves,” Slimes actually respawn after defeating any existing Slime. So, eliminating one triggers the next Slime to appear in its place – this continues until all 18 Slimes are dealt with.
Chamber 2
First Half
- Double Trouble: You’ll face two Geovishaps right off the bat. They’re susceptible to knockbacks, so use strategic positioning to group them up against a wall for easier management.
- Elemental Shift: When their health dips below 40%, or after a while, the Geovishaps transform, gaining Hydro and Cryo powers. This opens doors for elemental reactions! Use this to your advantage.
- Shielded Opportunity: When a Geovishap slams a shielded character, it gets momentarily stunned. Capitalize on this vulnerability to deal extra damage.
- Second Wave: Two Vishaps enter the fray next, positioned close together. Lure them towards you (unless you have Anemo crowd control) to trigger a slam attack, creating another stun window.
- Damage Resistance: Keep in mind that these Vishaps have a 30% resistance to Physical and Hydro damage. Adjust your team composition accordingly.
Second Half
- Group Therapy: The first wave features enemies clustered together. Use this to your advantage! An Anemo character can swirl Hydro onto the Pyro Abyss Mage’s shield, effectively breaking it.
- Shield Down, Mage Down: Prioritize eliminating the Pyro Abyss Mage’s shield with Hydro attacks. Once the shield falls, the Mage becomes vulnerable – take it down quickly! Then mop up the remaining Slimes.
- Repeat and Conquer: The second wave follows the same principle. A Cryo Abyss Mage is surrounded by Pyro Slimes. Use your Anemo character to swirl and control the battlefield, making quick work of the enemies.
Chamber 3
First Half
This chamber is a straightforward brawl against two Ruin Drakes. Don’t worry about positioning – once you engage one, the other joins the fight. The key is to unleash a relentless assault while dodging their attacks.
Ruin Drakes have weak points you can exploit:
- Thruster Weak Points (Wings): Visible only when the Drake is airborne and undamaged.
- Chest Weak Point: Exposed during the “Missile Barrage” attack (unofficial name) where the Drake fires a series of missiles.
- Head Weak Point: Appears during the “Energy Surge” attack (unofficial name) – a charging sequence followed by an aerial bomb attack.
Targeting these weak points is optional. If a hovering Drake proves troublesome, focus on grounding it before attacking.
Second Half
The first wave of enemies in the second half surrounds your characters. With various elemental foes present, prepare for diverse reactions.
Here’s how to handle this chaotic fight:
- Prioritize the Mirror Maiden: This enemy boasts the highest HP and ATK, and frequently teleports to maintain distance.
- Control the Crowd with Anemo: Use Anemo characters to group the Treasure Hoarders for easier AoE attacks. Focus on interrupting their movement to avoid surprises.
- Understand the Wave System: Enemies respawn in waves. Defeating a specific Treasure Hoarder type (e.g., Pyro) will make another of the same type appear in its place. This applies to both Treasure Hoarders and Mirror Maidens.
By following these tips and strategically utilizing elemental reactions, you’ll be well on your way to conquering Floor 11 in Genshin Impact‘s 4.4 Spiral Abyss!
Related: