Even if you are leveraging Active Directory, you still need to understand how local users and groups work. Local users and groups provide a key role not only for maintenance but also for central administration.
In this section, you will see how to manage local users and groups on both Windows Server 2008 R2 full server installations and Server Core installations. You will also learn the default local users/groups and the default settings on these servers and how those settings impact your infrastructure.
1. Learn Default Local Users and Groups
Whether you are working with a Windows Server 2008 R2 full installation or with Server Core, managing local groups offers some great similarities. Starting with the default installations, both systems have the same default users and groups installed.
On your Windows Server 2008 R2 server, by default you have two user accounts that are created, Administrator and Guest.
-
Administrator is the default built-in account for administering the local machine. The Administrator account is by default the only account that is enabled.
-
Guest is the default built-in account for guest access to the system; however, the account is disabled by default.
Table 1 describes several other groups installed by default that you need to know.
Placing user accounts in these local groups will grant those users access to the proper permissions and responsibilities for the groups. The basic concept behind using groups allows you to assign permissions just once to the group, thus granting permissions to all the members in the group. This offers an easy way for you to delegate administration for your server. For example, if you want to have a user perform a daily backup of your server, you would simply need to add them to the Backup Operators group, and they would be granted the necessary rights to perform backup and restore operations.
2. Administer Local Users and Groups
Managing local user groups on your server is just a matter of loading the correct snap-in for the Microsoft Management Console (MMC). You can manage either a Windows Server 2008 R2 full server installation or a Server Core installation. However, if you want to manage the local users and groups on your Server Core installation with the MMC you will need to do that remotely. There are system commands allowing you to manage Server Core locally, and you will see those commands later in this section. To access the local user groups, you can go to the Control Panel to manage the accounts, or you may prefer a more thorough look at the users. You will see the local users and group management tools for both a full server and Server Core installation in the following steps.
-
Select Start => Run, type in MMC, and hit Enter. This loads a blank MMC, as shown in Figure 1.
Figure 1. Blank MMC

-
To perform work in any blank MMC, you need to load the appropriate snap-in. To load snap-ins, select File => Add/Remove Snap-In. This will load the Add Or Remove Snap-Ins dialog box, as pictured in Figure 2.
Figure 2. Adding snap-ins


To manage your local users and groups, select the Local Users And Groups snap-in, and click the Add button. This will open the Choose Target Machine dialog box, as pictured in Figure 3.
Figure 3. Target machine
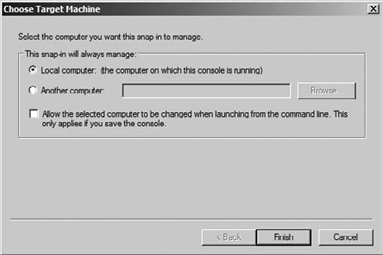

In the Choose Target Machine dialog box, you can either select the local computer to manage the users on the machine you’re running the console from or select the Another Computer radio button and enter either the IP address or the name of the computer you want to manage. This option will allow you to manage the local users and groups on a remote server such as Server Core, if you have the appropriate permissions. After you make your selection, click Finish to return to the Add Or Remove Snap-Ins dialog box.
-
In the Add Or Remove Snap-Ins dialog box, click OK to load the snap-in into your MMC. Figure 4 shows a local users and group MMC.
Figure 4. Managing local users and groups
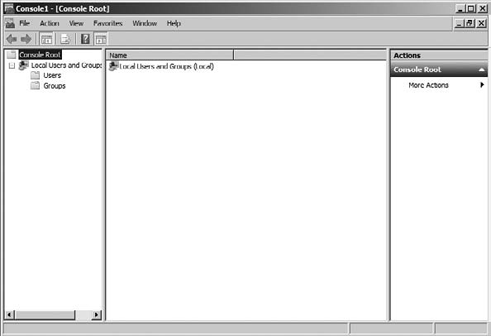

After you have loaded your snap-ins into the MMC, you can save your customized MMC for future use. To do so, select File => Save.
After you have loaded the MMC to manage local users and groups, you can easily work with your users and groups. Creating user IDs and groups, changing passwords, or other properties can all be easily done with the interface.
2.1. Create a Local User Account
When you create a local user account, you are granting the account access to the local server, which is a straightforward process:
-
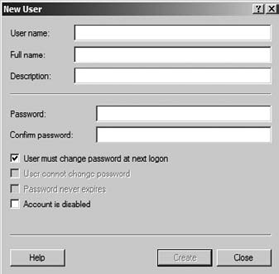
Select New User, which will display the New User dialog box, as shown in Figure 5.
Figure 5. New User dialog box

-
Type in the username, full name, and optional description, as well as the password. The password by default must follow the password complexity requirements listed in the “Default Password Requirements” sidebar. Additionally, you can mark the account disabled, if you know the account will not be in use for a period of time. You also have the following options regarding the setting of the initial password:
User Must Change Password At Next Log On This is the default setting, and you should consider keeping this check box enabled when you create a new user account. The only time you should clear this check box is when the account you are creating will be a service account for an application. This setting allows the user to set their own personal password when they log on to the system the first time. All you need to do as the administrator is set an initial temporary password for the user. You may want to know the passwords for your users in case a user leaves the company or is on vacation. In reality, as long as you know the administrator password, you have the administrative right to reset a password temporarily and gain access into an account. Although it is good to have this ability, you should exercise it with caution and only when the situation warrants it.
User Cannot Change Password By default this setting is grayed out and becomes available only when you clear the User Must Change Password At Next Log On setting, mentioned previously. This allows you to make sure the password for the account does not change. This is also good for service accounts for applications loaded on your server. This setting will also bypass any local machine password account policy.
Password Never Expires By default this setting is also grayed out, and like the previous setting, it becomes available only when the User Must Change Password At Next Log On setting is cleared. The setting, as the name implies, locks down the password. This setting also will bypass any local machine password policy.
-
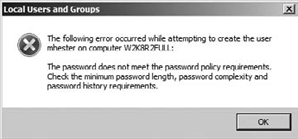
After you fill out the form, click Create to create the account. If your password does not meet the requirements for password complexity, you will see the screen in Figure 6.
Figure 6. Password complexity error

2.2. Create a Local Group
After you create your user accounts, you will most likely want to create groups to add your users to. Groups, as you may know, are used to grant permissions generally to files or printers located on the Windows Server 2008 R2 server. These local groups can be granted rights and permissions to resources only on the local server.
-
Select New Group, which will display the New Group dialog box, as shown in Figure 7.
Figure 7. New Group dialog box


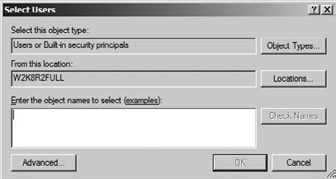
Type in the name of the new group and a description. To immediately add members to your group, click the Add button on the bottom of the screen. Clicking the Add button displays the Select Users dialog box, as shown in Figure 8.
Figure 8. Select Users dialog box

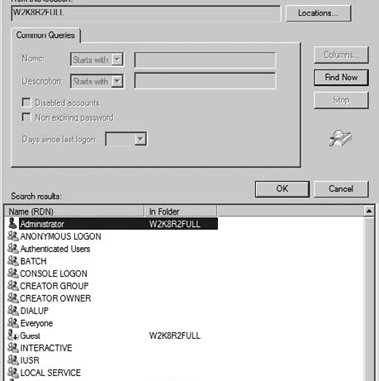
To add users, you can type them in the name text box. To verify the spelling of the user names you want to add, you can click Check Names, which will verify the usernames for you. You can also click the Advanced button, which will expand the dialog box to allow you to list all the user accounts on the system. This dialog box has a Find Now option to allow you to quickly list all the users on the system. If you click Find Now, you will see a screen similar to Figure 9.
Figure 9. Advanced selecting users

-
After you click Find Now, you will see a list of users on the system, as well as local system user and group accounts. Select the user or users you want to be in your group. To select multiple users, you can hold down the Ctrl key on your keyboard as you click. You could also select a list by using the Shift key. If you click the top item of your list, hold down the Shift key, and click the bottom item on your list, you will select all the items between and including your top and bottom selection.
Special Identity GroupsYou may notice that when you were adding users to your group, you had several more accounts and groups that you did not create. These are special identity groups, and you cannot control the membership of these groups. Your users become members of these groups through the course of actions they perform on your servers or how they access servers, and the membership to these groups is temporary and normally changes given how the user will work with the system. System groups can be used to help set permissions based on how users access or interact with the server. Table 2 lists a few of the system groups you may encounter as you work with the server. The groups that are not listed in the table are normally system groups that are reserved for the use of the operating system and the services running on your Windows Server 2008 R2 server. In particular, you need to pay particular attention to one special identity account, the SYSTEM account. The SYSTEM account represents the Windows Server 2008 R2 operating system. As you work with the files on your server and the user rights, you may encounter the SYSTEM account, and you should leave this account unmodified. If you make a change to the permissions or rights the SYSTEM account has on your server, you could disable your server, which may result in you reinstalling the operating system.
|
2.3. Manage Your Local Users and Groups
After you are done creating your user groups, you will need to maintain and manage the local accounts. To begin managing local groups, just right-click the user or group you want to manage. They share some common tasks. When you right-click a user or group, you can delete, rename, open help, or view the unique properties for the object.
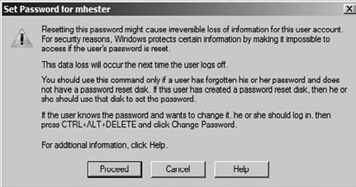
When you right-click the user, you can set a new password for the user. The only time you should set the password for an existing account is if the user has forgotten or lost their password. The user will lose access to information such as encrypted files, stored Internet passwords (although the user can re-create these with the new password), email that is encrypted with the user’s public key, and any stored certificates (again, new certificates can be issued to still grant access). The potential risk here is losing data in files that have been encrypted by the encrypted file system (EFS). If you have backed up your recovery keys, you will be able to retrieve data; however, if there is no backup of the keys, you will not be able to access the data.
When you right-click a user account, you are presented with the choice to set the password. When you select the option, you will receive the warning shown in Figure 10.
Figure 10. Setting password warning
When you right-click a group and select Add to Group, this will start the same process to add members to your group as used in the previous procedure when you created the group. Additionally, when you select the Properties option after you right-click the group, it will take you to the properties where you can use the Add Members dialog box.
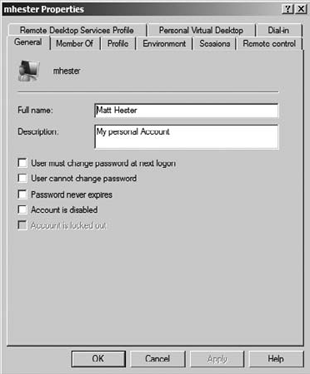
When you select the Properties option after you right-click will open a list of properties you can modify for the user account, as shown in Figure 11.
The properties listed here are part documentation and part account configuration. The tabs listed will allow you to configure basic username and description information and group membership. You can also set properties for Remote Desktop Services connections information, user profiles, home directory information, and dial-in access.
Figure 11. User properties
2.4. Manage Local Users and Groups on Server Core
You may not have access to a Microsoft Management Console, and you may need to make modifications to the local users and groups on a Windows Server 2008 R2 Server Core installation. You can add, delete, and modify all aspects of the local users and groups via the command prompt. Specifically, the net command is how you work with users and groups directly on Server Core. The net command will also work on a Windows Server 2008 R2 full server installation.
The net command has many functions, including starting and stopping services and configuring the IP address on the server. You will see in this section how to use the net command to work with your local users and groups.
All of the net commands begin with net; for users this will be followed by user, and for local groups this will be followed by localgroup. For example, to see the current list of your local users or local groups, type one of the following straightforward commands and hit Enter:
-
Use net user to see a list of local users.
-
Use net localgroup to see a list of local groups.
To add a user or local group to the system, the commands follow similar syntax. The commands will include the /add switch. For example, to add a user named Harold with a password of pass@word1 to your system, you would use the following command:
net user Harold pass@word1 /add
To add a local group called Writers to your server, you would use the following command:
net localgroup Writers /add
To add Harold to the Writers group, you would use the following command:
net localgroup Writers Harold /add
To see the current membership for the local group Writers, you would use the following command:
net localgroup Writers
The commands are straightforward and fairly intuitive to learn how to use. To learn more about commands to work with local users and groups, just use the built-in help system: