As your network computers are backed up nightly, Windows Home Server maintains a database of the backups that it’s currently storing for each computer. The number of backups in the database depends on the Client Computer Backup Retention settings you specified for saving daily, weekly, and monthly backups. Windows Home Server enables you to access this database of backups and see the status of each backup, view a backup’s details, prevent a backup from being deleted, and browse the files in a backup. The next few sections provide the details.
Viewing a Computer’s List of Backups
In the Windows Home Server Dashboard, the Computers and Backup tab has a Status column that tells you the current state of the backups for each computer. You can see five values in the Status column:
-
Successful— This means that the computer’s most recent backup completed without a hitch.
-
Unsuccessful— This means that the computer’s most recent backup failed. This status also generates a Critical alert.
-
Set Up— This means that the computer is on the list of clients to get backed up, but a backup has not yet occurred, probably because the computer is sleeping (and you didn’t configure the client to wake up for backups) or not connected to the network.
-
Not Set Up— This means that you’ve disabled backups for the computer .
-
Unknown— This status means that Windows Home Server can’t determine the computer’s current backup status.
Note that seeing Unsuccessful for a computer doesn’t necessarily mean that Windows Home Server has never been able to back up the computer; it just means that the most recent backup attempt failed; Windows Home Server might still have a successful backup stored, so it might be possible to restore the computer if the need arises.
If you want to know the status of the individual backups, you need to display the computer’s list of backups. Here are the steps to follow:
|
1.
|
Log on to the Windows Home Server Dashboard.
|
|
2.
|
Display the Computers and Backup tab.
|
|
3.
|
Click the computer you want to work with.
|
|
4.
|
Click View the Computer Properties. The computer’s Properties dialog box appears.
|
|
5.
|
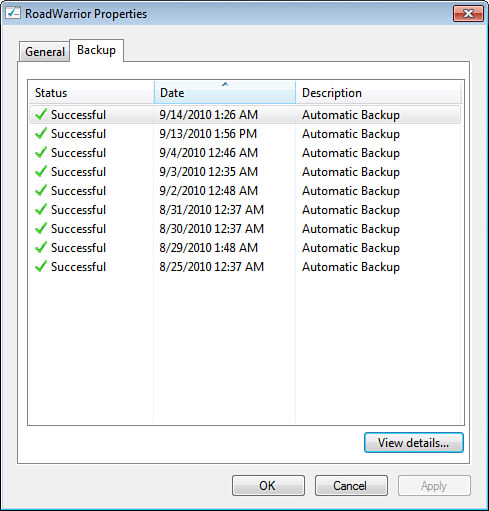
Click the Backup tab, which displays the backups. Figure 1 shows an example.
Figure 1. The Backup tab shows the list of stored backups on the computer.
|
Tip
You can also double-click a computer to see its list of backups.
The list of backups has three columns:
-
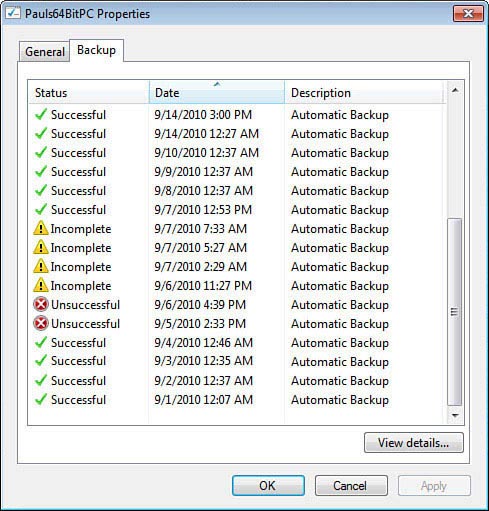
Status— This column tells you the status of the backup. There are three possibilities (see Figure 2):
-
Successful—Windows Home Server successfully backed up the entire computer.
-
Incomplete—Windows Home Server backed up some, but not all, of the computer. In other words, this status tells you that at least one drive on the computer was not backed up properly.
-
Unsuccessful—Windows Home Server backed up zero drives on the computer.
Figure 2. The Status column can have three values: Successful, Incomplete, or Unsuccessful.

-
-
Date— This column tells you the date of the backup or backup attempt.
-
Description— This column shows either Automatic Backup (for the nightly Windows Home Server backups) or the description of a manual backup you ran.
Viewing Backup Details
The View Backups window tells you some useful information about each backup, but there is more data available. For example, it’s also possible to see the partitions included in the backup, the size of the backed up files, and the folders that were excluded from each partition during the backup.
To view this extra detail for a backup, follow these steps:
|
1.
|
Log on to the Windows Home Server Dashboard.
|
|
2.
|
Display the Computers and Backup tab.
|
|
3.
|
Click the computer you want to work with.
|
|
4.
|
Click View the Computer’s Properties. The computer’s Properties dialog box appears.
|
|
5.
|
Click the Backup tab.
|
|
6.
|
Click the backup you want to view.
|
|
7.
|
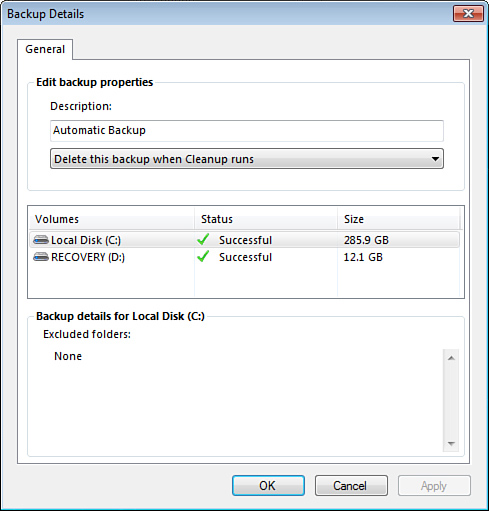
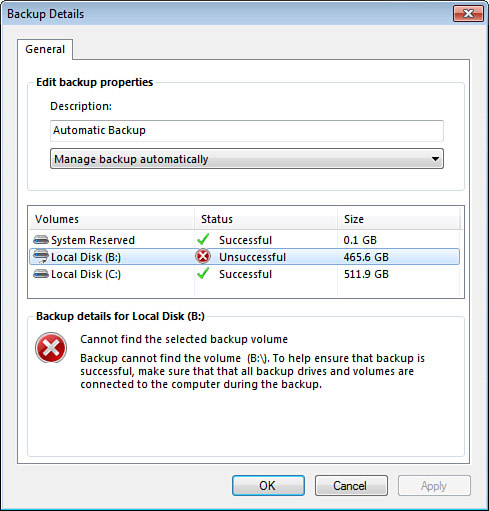
Click View Details. The Backup Details dialog box appears, as shown in Figure 3.
Figure 3. The Backup Details dialog box provides extra information about each backup.
|
Tip
You can also double-click a backup to see its details.
Note that in the Volumes in Backup list, Windows Home Server shows the partition name (drive letter and partition label), capacity, and location (internal or external). It also shows the status for each partition, which will be either Successful or Unsuccessful. So if the overall status of the backup is either Incomplete or Unsuccessful, you can view the details and see which partition is causing the problem. Click the failed volume backup to see the Failure Details, as shown in Figure 4.
Figure 4. If the overall backup status is Incomplete or Unsuccessful, the Backup Details dialog box tells you which partition (or partitions) failed.
Note
What should you do if a particular partition is failing routinely? First, just try rebooting the client computer to see if that helps. If it’s an external hard drive, make sure the drive is powered up and connected to the PC. It’s also possible that a drive error could be causing the problem, so run Windows’ Check Disk utility on the drive. (Right-click the partition, click Properties, display the Tools tab, and then click Check Now. Note that this operation requires Administrator credentials in Windows Vista.) If you still can’t get Windows Home Server to back up the partition successfully and if the partition doesn’t contain important files, exclude it from the backups.
Preventing Windows Home Server from Deleting a Backup
Windows Home Server deletes old backups every Sunday according to the Client Computer Backup Retention settings. However, sometimes you might not want Windows Home Server to remove a particular backup during the cleanup process. For example, you may know that a backup contains an important version of a file or folder, and you always want the ability to restore that version if necessary.
For such situations, you can tell Windows Home Server not to delete a particular backup. Follow these steps:
|
1.
|
Log on to the Windows Home Server Dashboard.
|
|
2.
|
Display the Computers and Backup tab.
|
|
3.
|
Click the computer you want to work with.
|
|
4.
|
Click View the Computer’s Properties. The computer’s Properties dialog box appears.
|
|
5.
|
Click the Backup tab.
|
|
6.
|
Click the backup you want to keep.
|
|
7.
|
Click View Details.
|
|
8.
|
In the Edit Backup Properties section, use the list to select the Keep This Backup item. The next time it runs the backup cleanup, Windows Home Server won’t delete the backup.
|
|
9.
|
Click OK to return to the Properties dialog box, and then click OK to return to the Dashboard.
|
Cleaning Up Old Backups
Windows Home Server’s backup cleanup process should prevent each computer’s list of backups from getting unwieldy. Even so, there are situations in which you might want to accelerate the cleanup process:
-
You have a number of manual backups that you no longer need.
-
The list of backups includes many failed or incomplete backups that you no longer need to see (because, for example, you’ve solved whatever problem was causing the unsuccessful backups).
-
You’re running low on storage space in Windows Home Server.
Here are the steps to follow to schedule a backup to be deleted the next time Windows Home Server performs the backup cleanup:
|
1.
|
Log on to the Windows Home Server Dashboard.
|
|
2.
|
Display the Computers and Backup tab.
|
|
3.
|
Click the computer you want to work with.
|
|
4.
|
Click View the Computer’s Properties. The computer’s Properties dialog box appears.
|
|
5.
|
Click the Backup tab.
|
|
6.
|
Click the backup you want to keep.
|
|
7.
|
Click View Details.
|
|
8.
|
In the Edit Backup Properties section, use the list to select the Delete This Backup When Cleanup Runs item. The next time it runs the backup cleanup, Windows Home Server deletes the backup.
|
|
9.
|
Repeat steps 6–8 to schedule other backups for deletion.
|
|
10.
|
Click OK.
|
Creating a Bootable USB Recovery Key
The worst-case scenario for PC problems is a system crash that renders your hard disk or system files unusable. Your only recourse in such a case is to start from scratch with either a reformatted hard disk or a new hard disk. This usually means that you have to reinstall Windows and then reinstall and reconfigure all your applications. In other words, you’re looking at the better part of a day or, more likely, a few days, to recover your system.
Fortunately, with just a bit of foresight on your part, you can avoid all that by recovering your entire PC using a Windows Home Server backup of that system. The only foresight required (besides making sure that Windows Home Server is successfully backing up your computer) is creating a Windows Home Server recovery key on a USB flash drive. By inserting the drive in your down-and-out PC, the drive boots automatically and takes you through the recovery steps.
Here are the steps to follow to create a USB recovery key:
|
1.
|
Using the computer you want to protect, log on to the Windows Home Server Dashboard.
|
|
2.
|
Click Computers and Backup.
|
|
3.
|
|
|
4.
|
Click the Tools tab.
|
|
5.
|
Click Create Key. Windows Home Server launches the Create Computer Recovery Key Wizard.
|
|
6.
|
Insert a USB flash drive into the server, and give the drive a minute or so to mount.
Caution The USB flash drive you use must have a capacity of at least 512MB. Also, creating the recovery key deletes any existing files on the drive, so make sure the drive contains no data you want to keep. (If it does, copy the files to a safe location before proceeding.) |
|
7.
|
Click Next. The wizard asks you to select the USB flash drive.
|
|
8.
|
Use the list to select the drive, activate the check box (to indicate your understanding that the wizard will delete all files on the drive), and then click Next. The wizard creates the computer recovery key on the drive. Note that this takes a few minutes.
|
|
9.
|
When the wizard is done, click Close.
|
Repairing a Client’s Backups
If you’re having trouble accessing a client backup, it’s possible that the database that Windows Home Server uses to store the backups has become corrupted. In that case, you can use Windows Home Server’s repair tool to fix the problem. Here’s how it works:
|
1.
|
Using the computer you want to repair, log on to the Windows Home Server Dashboard.
|
|
2.
|
Click Computers and Backup.
|
|
3.
|
Click the Additional Client Computer Backup Tasks link.
|
|
4.
|
Click the Tools tab.
|
|
5.
|
Click Repair Now. Windows Home Server runs the Repair the Backup Database Wizard.
|
|
6.
|
Activate the check box (to indicate your understanding that the wizard might have to delete one more existing backups during the repair), and then click Next. The wizard begins the repair process.
|
|
7.
|
When the wizard is done, click Close.
|
