Ever feel like your computer is struggling to keep up? Does one program seem to slow everything down? This article explores how to fine-tune your PC’s performance by taking control of processor allocation and priority.
Why Take Control?
Windows typically does a good job of distributing tasks across your CPU cores. However, setting processor affinity allows you to manually assign a specific core (or cores) to a particular application. This can be beneficial in a few ways:
- Enhanced Performance: Some applications rely heavily on specific tasks executed on a single core. Assigning that application to its preferred core can lead to smoother, more efficient operation.
- Conflict Resolution: Multiple applications competing for the same core can create bottlenecks. Setting affinity can isolate processes, preventing conflicts and improving overall system performance.
- Troubleshooting: Isolating an application to specific cores allows you to pinpoint its impact on your system and identify potential CPU usage or performance issues.
How to Set Processor Affinity and Priority on Windows
Ready to give it a try? Here’s how to set processor affinity in Windows:
Setting Processor Affinity
- Press
Ctrl+Shift+Escto open Task Manager. - Click the “Details” tab to view a list of running processes.
- Find the application you want to optimize and right-click on it.
- Select “Set affinity” from the context menu.
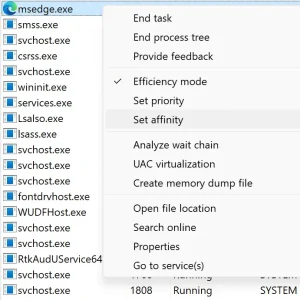
- In the pop-up window, tick the boxes next to the CPU cores you want to assign to the application.
- Click “OK” to save your changes and close the window.
Process Priority: Another Performance Lever
While processor affinity assigns specific cores, process priority dictates how much CPU time an application receives. Here’s how to adjust process priority in Windows:
- Press
Ctrl+Shift+Escto open Task Manager. - Click on the “Details” tab.
- Right-click on the process and select “Set priority.”
- Choose the desired priority level from the list:
-
- Realtime: Highest priority, ideal for critical system tasks (use with caution).
- High: Prioritized for demanding applications.
- Above normal: Slightly higher priority than normal processes.
- Normal: Standard priority level for most applications.
- Below normal: Lower priority, suitable for background tasks.
- Low: Lowest priority, minimal CPU allocation.
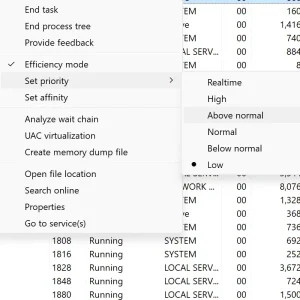
- Click “OK” to confirm the changes.
While these tools offer some control, it’s important to use them judiciously. Improper settings can lead to unintended consequences like system instability. It’s recommended to research the specific application before adjusting its affinity or priority.
By understanding processor affinity and process priority, you can potentially fine-tune your Windows system for better performance. However, remember to exercise caution and prioritize system stability when making adjustments.
Related: