Have you ever wondered how much data your computer uses? Even with unlimited plans, monitoring your internet usage can be helpful. Here are three ways to do it on your Windows PC:
Simple Ways to Monitor Internet Usage on Windows
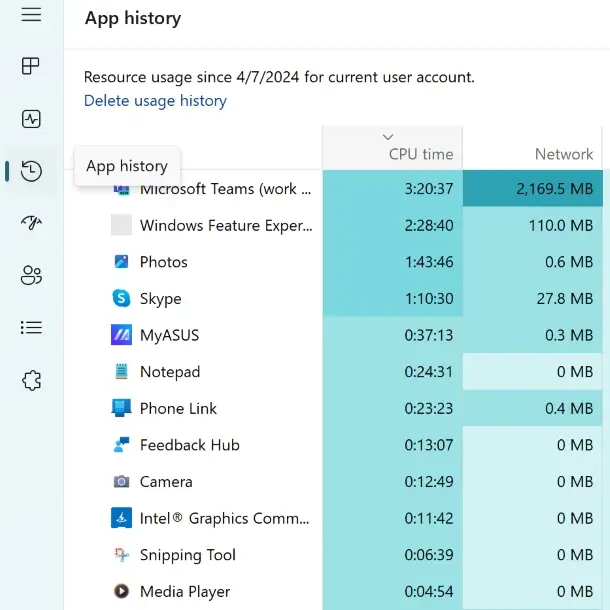
Task Manager
For a basic overview of data-hungry applications, the trusty Task Manager comes in handy. Open it by pressing Ctrl + Alt + Escape and click “More details” for the full view. Navigate to the “App history” tab and sort by “Network” to see which apps have consumed the most data in the last month.
Command Prompt
Command Prompt provides another way to monitor internet usage without external tools. Open it with administrator rights and type:
netstat -e -s
This displays received and sent data packets (in bytes) categorized by Unicast and Non-Unicast packets, indicating whether data is sent to a single destination or multiple. Scrolling further reveals data usage statistics by TCP, UDP, and IPv4/IPv6.
Command Prompt also offers a powerful tool for viewing detailed network information for active connections. To see this, type:
netstat -anb
This command displays all IP addresses, categorized as “Listening” or “Established.” You can further analyze the processes (like browsers like “msedge.exe” or services like “svchost.exe”) that created these IP addresses.
Data Usage Overview
While Task Manager provides a snapshot of app usage, it’s limited to the last 7 days. For a more comprehensive picture, search for “Data Usage Overview” in the Windows search bar and select “Data Usage.”
- Windows 11: Head to Settings > Network & Internet > Advanced Network Settings > More Settings > Data Usage.

- Windows 10: Go to Start > Settings > Network & Internet > Data Usage.
On the right side of the screen (Windows 11), you’ll find a breakdown of app data usage for the last 30 days, 7 days, or 24 hours. Windows 10 users can access this by clicking “View usage per app.”
This window also allows you to set data limits. Choose your active network from the dropdown menu and click “Set limit.” Define the limit type (monthly, weekly, etc.) and data amount (GB or MB).
Resource Monitor
This free tool comes pre-installed with Windows. Simply search for “resmon” in the Start Menu or Run command (Win + R). In the “Network” tab, you’ll see a breakdown of processes using your internet, including data sent and received. If something seems excessive, you can close it through Task Manager.
NetworkUsageView
For a more detailed breakdown of internet usage, consider NetworkUsageView by NirSoft. This free tool offers a variety of filters to help you analyze the data. You can filter by application name, time period, or the amount of data sent or received.
Download the application from the official NirSoft website and extract the .exe file. Upon launch, you’ll see a list of all network usage profiles categorized by App Name and Timestamp. Double-clicking on any entry reveals the exact amount of data sent and received.
While the amount of information might seem overwhelming at first, the filters help you simplify the view and focus on what matters most to you.
BitMeter 2
If you’re looking for a tool that not only monitors internet usage but also sets alerts for exceeding data limits, BitMeter 2 is a great option.
Upon launch, BitMeter 2 displays a scrolling window showing your current internet usage. If you find this distracting, you can minimize it to the system tray. Right-clicking on the minimized icon allows you to access Statistics or Statistics Grid, providing a detailed summary of your network activity by day, hour, or month.
Beyond monitoring, BitMeter 2 lets you set alerts for high data usage over specific periods. The Calculator, ISP Restrictions, and Alerts features allow you to configure these settings easily.
With these three methods at your disposal, you can easily monitor your internet usage on your Windows PC and gain valuable insights into how your applications utilize bandwidth.
Related:


