5. How to Recover to an EFS-encrypted File Using a Data Recovery Agent
EFS grants data recovery agents (DRAs) permission to decrypt files so that an administrator can restore an encrypted file if the user loses his or her EFS key. By default, workgroup computers configure the local Administrator account as the DRA. In domain environments, domain administrators configure one or more user accounts as DRAs for the entire domain.
Because DRA certificates are not copied automatically when an administrator logs onto a computer, the process of copying the DRA certificate and recovering an EFS-encrypted file is somewhat lengthy (but straightforward). To recover an EFS-encrypted file, perform these steps:
- First, you need to obtain a copy of the DRA certificate. By default, this is stored in the Administrator user account on the first domain controller in the domain. To do this, using the DRA account, log on to the administrator account on the first domain controller in the domain.
- Click Start, and then click Run. Type mmc, and then press Enter. Respond to the UAC prompt that appears.
- Click File, and then click Add/Remove Snap-In.
- Click Add.
A list of all the registered snap-ins on the current computer appears.
- Double-click the Certificates snap-in.
- If the Certificates Snap-In Wizard appears, select My User Account, and then click Finish. Click OK.
The MMC console now shows the Certificates snap-in.
- Browse to Certificates – Current User\Personal\Certificates. In the details pane, right-click the domain DRA certificate, click All Tasks, and then click Export (as shown in Figure 2). By default, this is the Administrator certificate that is also signed by the Administrator, and it has the Intended Purpose shown as File Recovery.
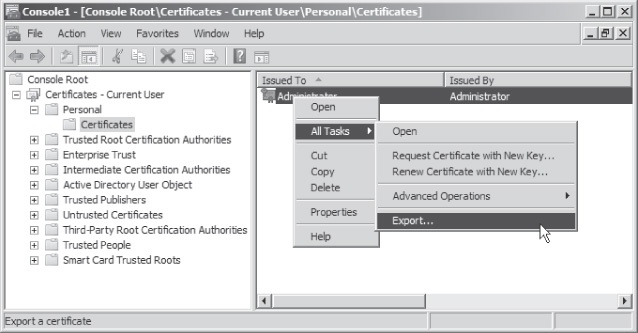
Figure 2. Exporting a certificate for EFS recovery
- In the Certificate Export Wizard, click Next.
- On the Export Private Key page, select Yes, Export The Private Key, and then click Next.
- On the Export File Format page, accept the default settings shown in Figure 3, and then click Next. For security reasons, you might want to select the Delete The Private Key If The Export Is Successful check box and then store the private key on removable media in a safe location. Then, use the removable media when you need to recover an EFS-encrypted file.
- On the Password page, type a recovery password twice. Click Next.
- On the File To Export page, type a file name to store the recovery password on removable media. Click Next.
- On the Completing The Certificate Export Wizard page, click Finish. Then, click OK.
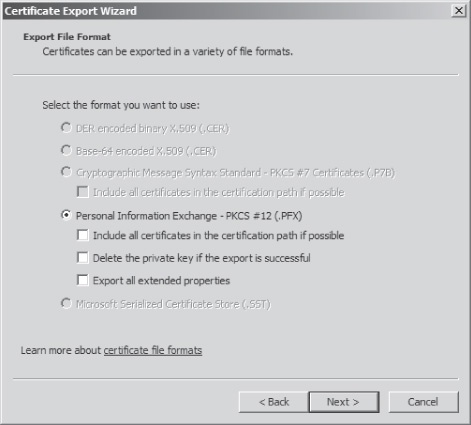

Figure 3. Using the default .PFX file format for the DRA recovery key
Now you are ready to import the DRA key on the client computer that requires recovery. Log on to the client computer and perform these steps:
- Click Start, and then click Run. Type mmc, and then press Enter.
- Click File, and then click Add/Remove Snap-In. Respond to the UAC prompt that appears.
- Click Add.
A list of all the registered snap-ins on the current computer appears.
- Double-click the Certificates snap-in.
- In the Certificates Snap-In Wizard, select My User Account, and then click Finish. Click OK.
The MMC console now shows the Certificates snap-in.
- Right-click Certificates – Current User\Personal\Certificates, click All Tasks, and then click Import.
- In the Certificate Import Wizard, click Next.
- On the File To Import page, click Browse. In the Open dialog box, click the file types list (above the Open button) and select Personal Information Exchange. Then, select the DRA key file and click Open. Click Next.
- On the Password page, type the password you used to protect the DRA key. Click Next.
- On the Certificate Store page, leave the default selection to store the certificate in the Personal store. Click Next.
- Click Finish, and then click OK.
Now you can open or decrypt the files just as if you had been added as an authorized user. To decrypt the files, view the properties for the file or folder and clear the Encrypt Contents To Secure Data check box. After you click OK twice, Windows uses the DRA key to decrypt the files. Now that the files are unencrypted, the user who owns the files should immediately re-encrypt them.
Tip
DECRYPTING RECOVERED FILES
If you use Windows Backup, files recovered from backup media will still be encrypted with EFS. Simply recover the files to a computer and have the DRA log on to that computer to decrypt them.
After recovering files, remove any copies of your DRA. Because the DRA can be used to decrypt any file in your domain, it’s critical that you not leave a copy of it on a user’s computer.