The best-laid plans: floor layouts are a breeze with MagicPlan
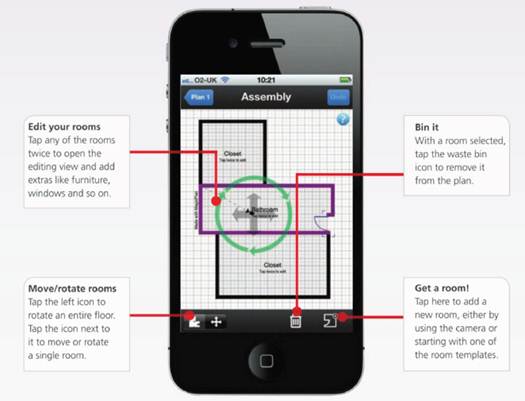
Edit your rooms
Tap any of the rooms twice to open the editing view and add extras like furniture, windows and so on.
The best-laid plans: floor layouts are a breeze with MagicPlan
Move/rotate rooms
Tap the left icon to rotate an entire floor. Tap the icon next to it to move or rotate a single room.
Bin it
With a room selected, tap the waste bin icon to remove it from the plan.
Get a room!
Tap here to add a new room, either by using the camera or starting with one of the room templates.
Vital info
Device: iPhone/iPad
Difficulty: intermediate
Time required: 15 mins
What you need:
- iOS 5.0 or later
- MagicPlan (free)
Traditionally, programs that are supposed to let you create floor plans quickly and easily are touted at consumers, but the insist on using the technical language of those who are familiar with computer-aided design. Not so MagicPlan, a clever free app that makes use of your iPhone or iPad’s camera to create a digital picture of a room (or an entire floor or a whole house) by capturing the corners and other important elements such as doors, then putting them all together to form an approximate plan. After that, you can measure the real room with a tape measure (a one-time ask) and produce an accurate calibration that will result in a proper floor plan.
There’s bags of features here (including the ability to download plans as PDFs or AutoCAD-friendly DXF files) but in this tutorial we’ll explain how to capture a simple room with a door, produce a plan, calibrate it accurately and then add a second room.
Step-by-step guide: I love it when a plan comes together
Step 1 – Main menu

Step 1 – Main menu
Download and install the free MagicPlan app from the iTunes Store (itun.es/isZ4Gd). The first time it loads, it’ll play a short overview tutorial (these videos play intermittently throughout the process, usually when you select a new feature to try). Then from the main menu tap the New Plan icon.
Step 2 – Your first corner
Step 2 – Your first corner
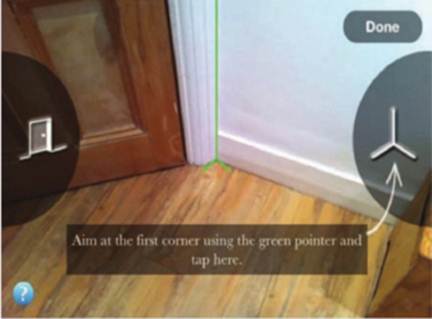
Select Residential or Commercial and whether to let the app use your location. Tap New Floor, choose a floor and pick a name. Stand where you can see all the room’s corners, turn the iPhone on its side, position the green pointer on the first corner and tap the icon on the right.
Step 3 – Hidden corners

Step 3 – Hidden corners
Stand in the same spot and rotate to the next corner. Can’t see the actual corner? Position the pointer where you think it is and then move the camera around slightly until all the overlaid graphics turn green – to indicate that the app has worked out the angles for you – and then tap again.
Step 4 – Doing doors
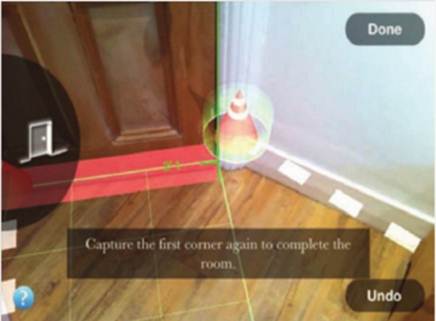
Step 4 – Doing doors
Again, stand in the same spot and rotate your way round the room. When you come to a door, position the pointer in the same way, but this time tap the Doro icon, then move across the bottom of the door and tap it again. To complete the room return to the first corner, tap it again and hit Done.
Step 5 – Calibrate your measurements
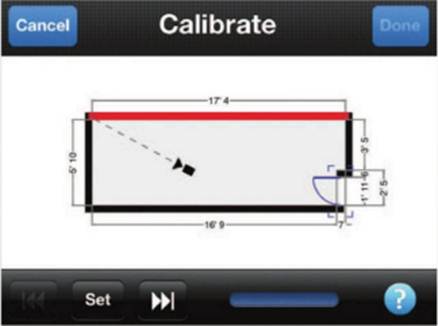
Step 5 – Calibrate your measurements
Next, grab a tape measure and measure the dimensions of the room you’ve just planned, then return to the home screen and tap Calibration. Select your plan, tap a wall to highlight it and use the roller to adjust the dimensions. Hit Set and repeat for the remaining walls.
Step 6 – Add more rooms
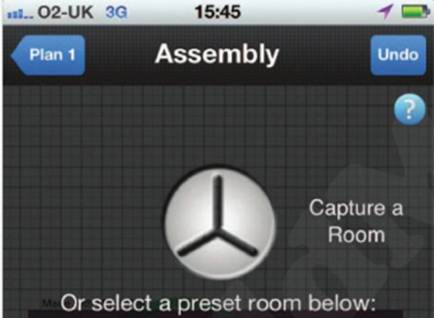
Step 6 – Add more rooms
Finished? Tap Done and then tap Save to confirm the calibration, which MagicPlan will use as the basis for all future plans. Now, you can add new rooms on the same floor from the Assembly screen either by capturing them as before or by using one of the presets shown here.