Problem : How to fix the error “Kernel Power Error in Windows 10 ( Event ID 41)”
Does your Windows computer turn off without notice or problem every time you try to start it from Sleep?
If so, your computer may have encountered a power failure, causing it to crash without warning.
This error called the Kernel-Power bug, seems to have no reason, but is a serious system problem.
Solution : Fix the error “Kernel Power Error in Windows 10 ( Event ID 41)”
Follow 5 steps to fix the Kernel Power Event ID 41 and prevent your computer from crashing :
1. Check Windows update
Check to see if Windows 10 is up to date. Microsoft releases updates for Windows 10 regularly, fixing bugs and other issues.
Press Win + I, type update in the search box and select Check for updates. If an update is available, download and install it, then reboot your computer.
2. Disable Windows 10 Fast Startup
Windows 10 Fast Startup is a sleep mode that allows the computer to start up extremely quickly. It activates by default during installation. If it enabled, the computer will not turn off completely.
It goes into a state that combines complete shutdown and hibernation, saving the nearest machine state to allow you to start working immediately.
However, unlike full hibernation, when you return to Windows 10, everything is like booting up from the beginning.
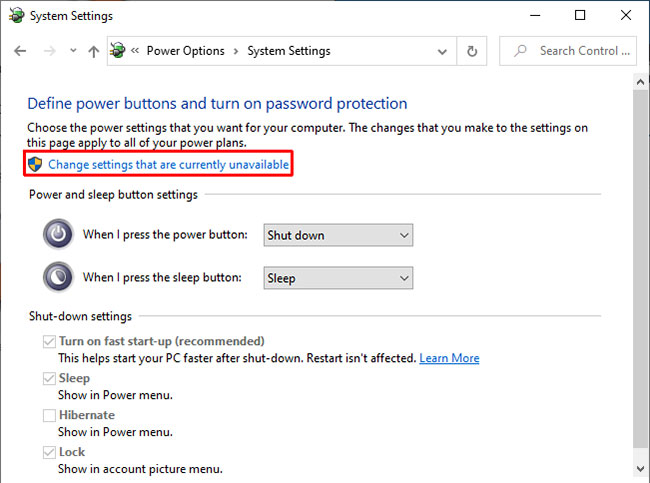
To turn off Windows 10 Fast Startup, enter power set into the search bar on the Start menu => select Choose a power plan.
Now select Choose what the power buttons do => Next select Change settings that are currently unavailable.
Uncheck Turn on fast start-up and click Save changes.
3. Reinsert the RAM and graphics card
Some users report the error “Kernel Power Error in Windows ( Event ID 41)” after reattaching RAM and graphics card (GPU).
You will have to go inside the computer to reattach the hardware.
4. Run CHKDSK and SFC
CHKDSK is a Windows system tool that you can use to verify your Windows 10 file system. Run it from Command Prompt, then use CHKDSK scan to find and fix the problem.
1. Open Command Prompt with Administrator account permission.
2. Type chkdsk / r and press Enter. The command will scan the system for errors and fix any problems.
If CHKDSK doesn’t find any errors, you can run Windows System File Check (SFC). Windows System File Check is another Windows tool that you can use to check for missing or corrupted Windows system files.
5. Check the error PSU with OCCT
Using OCCT, a free stress testing tool for CPU / GPU / PSU. OCCT stress tests the CPU, GPU, motherboard and in the process can detect any errors with the power supply.
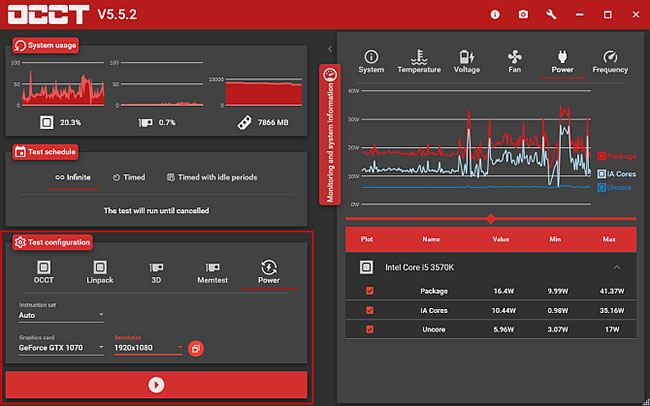
Open OCCT. In Test Configuration, select Power. Select the graphics card, then set the resolution to 1920 × 1080. Save all jobs and close any other open programs on the system. When ready, press the big red Play button icon in OCCT to start the stress test.
The OCCT developer claims that most bugs are detected within the first 5 minutes.
When the test is complete, OCCT creates a record highlighting any potential PSU errors (or with other hardware).