Dimension lines made a brief appearance in the preceding section on walls, windows, and doors. Whether you are creating floor plans or other measured or scaled technical drawings, you need to understand how to use the dimension line shapes.
If you go to More Shapes and expand the Visio Extras group, you see three dimensioning stencils:
-
Dimensioning—Architectural (US units)
-
Dimensioning—Engineering (Metric)
-
Dimensioning—Engineering (US units)
All three stencils actually contain the same set of shapes. The only difference is the default units that they display and the style of arrow used between extension lines.
With these dimensioning shapes, you can do things such as dimension the part shown in Figure 1.
Figure 1. A fully dimensioned mechanical part, using Visio’s dimensioning shapes. Note the Shape Data and right-click items for the selected dimension line.
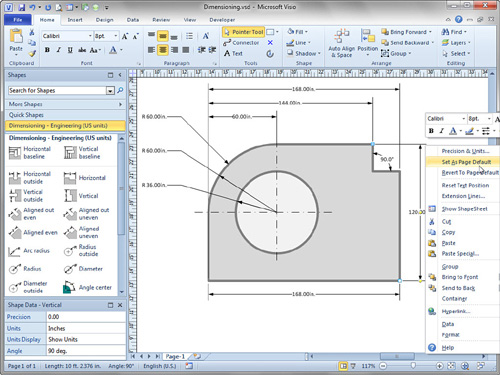
Dimension lines are pure Visio shapes, not a special built-in feature. They don’t use any special add-ons to get the job done. You position them using 1D endpoints and control handles, and you configure them using Shape Data or by right-clicking.
Keep in mind these basic principles when using these shapes:
- All dimension lines are 1D shapes. The 1D ends are the more important handles, so place these blue handles first. Tweak the yellow control handles afterward to fine-tune each shape.
- Snapping is important. You turn on snapping options via View, Visual Aids, Dialog box launcher. I recommend snapping to Shape geometry, Shape vertices, Shape intersections, and Connection points.
- You can set the precision and units for any dimension line by right-clicking or editing its Shape Data. If you want all dimensions to share the new settings, right-click the modified shape again and choose Set as Page Default. This updates a page-wide setting for precision and units. Think of it as the “make everybody look like me” feature. There is no Ribbon button for editing the page’s precision and units. You have to go through a dimension line.
- If you are dimensioning corners or interior spaces, you might want to turn off one or both extension lines. The Extension Lines right-click menu item helps you do this. Note that this is a per-shape setting; no page-wide application exists for extension lines.
- You can freely move the text for dimension line shapes. If you’d like to put it back in its default, automatic position, however, right-click and choose Reset Text Position.
- You can add text before or after the dimensioning number. To ensure that you don’t destroy the inserted field that displays the size, double-click the shape, or press F2 to get into text-edit mode. Then you can place the cursor before or after the dimension and freely add text.
Dimension line shapes aren’t hard to use, but they do take some practice and experimentation. If you get one in too sorry a state, just delete it and start over!