The latest Windows 11 update (version 2022) introduced a new feature in the Snipping Tool: automatic screenshot saving. While convenient for some, it might not suit everyone’s workflow. Here’s how to disable auto-save and regain control of your captured images.
What is the Snipping Tool?
The Snipping Tool is a handy app for capturing screenshots, photos, or other images on your screen. You can annotate them with your pen, touch, or mouse before saving, pasting, or sharing them with other applications. Since version 11.2209.2.0, it automatically saves your captures to the Pictures > Screenshots folder by default.
How to Disable Auto-Save in Windows 11 Snipping Tool
Turning off auto-save is a simple process:
- Launch the Snipping Tool (find it in the Start menu or search for it).
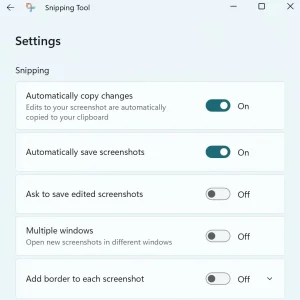
- Click the three-dot menu button in the top right corner and select “Settings.”
- In the Settings menu, locate the option labeled “Automatically save screenshots.”
- Toggle the switch to the “Off” position.
With these steps completed, your Snipping Tool captures will no longer be saved automatically. You’ll have the freedom to choose where and how you store your screenshots.
Restoring Auto-Save (Optional):
If you ever decide you miss the convenience of auto-save, simply revisit the Snipping Tool settings and re-enable the option.
Why Can’t I Use Registry Tweaks?
It’s important to note that the updated Snipping Tool is a Store app, meaning it receives updates independently of the main Windows operating system. This eliminates the possibility of tweaking its settings through the Registry or deploying them through automated methods.
Now you have complete control over your screenshots in Windows 11. Capture, edit, and save them on your terms, ensuring a smooth and efficient workflow.
Related: