Ever dreamt of playing your favorite PC games on your Steam Deck, but with the familiarity of Windows 11? This guide empowers you to achieve just that by installing Windows 11 alongside your existing SteamOS, giving you the best of both worlds.
How to Install Windows 11 on Steam Deck?
Downloading and Setting Up
Before diving in, ensure you have a flash drive or SD card with at least 8GB of free space. Download the following software:
- Ventoy: This tool allows you to boot from multiple operating systems on a single drive.
- GParted Live ISO: A partitioning tool for resizing your Steam Deck’s internal SSD.
- Windows 11 ISO: Download the official Windows 11 ISO from Microsoft.
- Steam Deck Windows Drivers: These drivers ensure proper hardware functionality in Windows.
Once downloaded, extract the Ventoy ZIP file and run the included installer. Select your flash drive or SD card, click “Install,” and wait for the process to complete. Now, copy the GParted Live ISO, Windows 11 ISO, and the Steam Deck drivers folder onto the Ventoy drive.
Booting into the Steam Deck Boot Manager
- Power down your Steam Deck completely.
- Hold down the volume down button and the power button simultaneously until you hear a chime.
- Release the power button but keep holding the volume down button until the boot manager appears.

- Using the directional buttons, select your SD card or flash drive.
Resizing the SSD Partition
- Launch GParted on Ventoy.
- Select the settings option in GParted: “GParted Live (Default Settings).”
- Choose “Don’t touch keymap” and your preferred language.
- Locate your SSD and right-click (left trigger) on the largest partition (usually /home), then select “Resisze/Move“.
- Drag the right slider left to create an unallocated space large enough for Windows 11 (we recommend at least 250GB).
- Click “Resize/Move” and then the green checkmark in the toolbar to confirm the changes.
- Exit GParted by clicking the power button on the Steam Deck.
Installing Windows 11
- Unplug any other USB devices you used earlier except the flash drive to prevent the ISOs or Ventoy from malfunctioning.
- Go back to the boot manager using the volume down and power buttons.
- Select your SD card or flash drive and choose the Windows 11 ISO.
- Follow the on-screen instructions for the Windows 11 setup process.
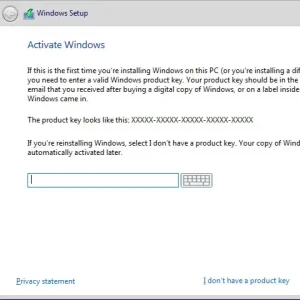
- When prompted for a product key, you can safely choose “I don’t have a product key.”
- On the “Where do you want to install Windows?” screen, scroll to the very bottom and select the unallocated space you created earlier.
- Click “New” and then “Apply” to format the partition for Windows.
- The installation process will begin.
Installing Steam Deck Drivers and Completing Setup
- Open File Explorer and navigate to the Steam Deck drivers folder on your SD card.
- Install each driver individually, starting with any executable file.
- For audio drivers, right-click the “Setup information” file and select “Install.”
- Restart your Steam Deck once all drivers are installed.
Congratulations! You’ve successfully dual-booted Windows 11 onto your Steam Deck. Now you can enjoy the flexibility of switching between SteamOS and Windows 11 at your convenience. Remember, this process requires technical expertise and may not be suitable for everyone. Proceed with caution and refer to online resources for troubleshooting if needed.
Related: