SBS manages DHCP and DNS with no user intervention required in most cases. SBS configures itself to be the only DHCP server on the network, and the primary DNS server as well. You should normally not have to change any of the DNS or DHCP settings on your network for basic operation, but there can be specialized needs that require additional configuration. For example, on our network we prefer to have a larger excluded range of IP addresses that the DHCP server can’t use because of how we configure key workstations and printers.
Note:
The tools you need for DHCP and DNS are the DHCP console (dhcpmgmt.msc) and the DNS Manager console (dnsmgmt.msc), respectively. You can open these consoles from the Administrative Tools menu, from the SBS Native Tools Management console, from the Windows SBS Console (Advanced Mode), or directly from the command line. We use the command line.
1. Managing DHCP
DHCP automatically provides computers on the local network segment with valid IP addresses and important additional configuration settings, including the addresses of DNS servers and the default gateway, along with other configuration settings if needed. SBS manages the core DHCP settings automatically, but you can add additional settings as appropriate for your environment, as well as view and manage the current address leases and exclusions. If your network includes printers or other devices that require unchanging IP addresses, you can either exclude the address from use by DHCP and manually set the device or configure DHCP for an address reservation to ensure that the device will always get the same address. On our network, we also assign DHCP reservations to key workstations so that they’re at predictable IP addresses to simplify troubleshooting.
Note:
Although it isn’t required to exclude a DHCP address that you assign a reservation to, we prefer to exclude an entire range of addresses and then use DHCP reservations within that range for computers and devices we want predictable addresses for. Not the normal way, but it works for us and our admittedly specialized needs.
SBS expects to be the only DHCP server on your network, and if it senses another DHCP server, it will stop the DHCP Server service to prevent handing out duplicate IP addresses. During initial installation of SBS, if there are other DHCP servers on your network (such as your router), the setup process will either disable the other DHCP server if it responds to a UPnP request, or will prompt you to disable the server manually. While it’s technically possible to use some other DHCP server rather than the SBS server, the SBS wizards are designed to function best if SBS controls the DHCP server functionality.
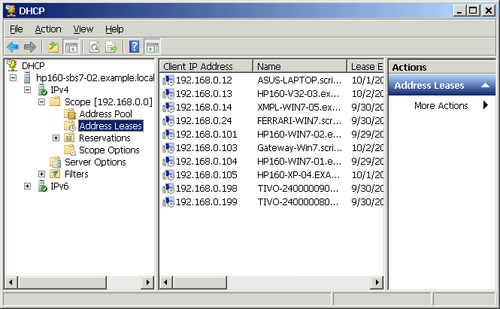
1.1. Viewing Current DHCP Address Leases
To view the addresses currently leased to clients, complete the following steps:
Open the DHCP console if it isn’t already open.
In the left pane, expand the containers until you can select Address Leases in the IPv4 container, as shown in Figure 1, to view a list of currently assigned IP addresses and their corresponding host names.
Figure 1. Viewing assigned IP addresses

1.2. Creating Exclusions in DHCP
The pool of addresses that a DHCP server can lease to clients is called a scope. For any device on the network that has a static IP address within the scope, you need to create an exclusion to prevent the DHCP server from handing out that address to a client.
To create an exclusion, complete the following steps:
Open the DHCP console if it isn’t already open.
In the left pane, expand the containers until you can select Address Pool.
In the Add Exclusion dialog box, shown in Figure 2, use the Start IP Address and End IP Address boxes to specify the range of IP addresses you want to exclude. To exclude a single IP address, type it in the Start IP Address box and leave the End IP Address box blank.
Figure 2. The Add Exclusion dialog box


1.3. Adding a DHCP Reservation
As an alternative to manually setting and managing IP addresses for fixed IP devices, such as printers, you can use DHCP to assign an address and configuration settings to the device, and then use a DHCP reservation to ensure that the device always gets that address and that no other device or client is assigned that address. Because reservations inherit the scope options and can be easily modified from a single point, it’s much better to use a reservation instead of manually setting or managing IP addresses for devices that support DHCP.
To create a DHCP reservation for an existing DHCP client, complete the following steps:
Open the DHCP console if it isn’t already open.
In the left pane, expand the containers until you can select Address Leases in the IPv4 section.
Right-click the device you want to create a reservation for, as shown in Figure 3, and select Add To Reservation.
Figure 3. Converting an existing lease into a DHCP reservation


Click OK. The existing DHCP lease will be converted into a DHCP reservation.
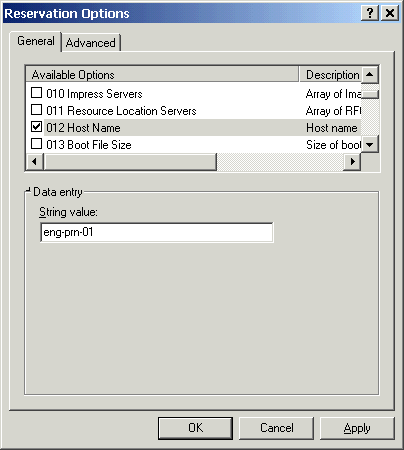
To create a DHCP reservation for a device that doesn’t currently have a DHCP address, complete the following steps:
Open the DHCP console if it isn’t already open.
Select New Reservation from the Action menu to open the New Reservation dialog box shown in Figure 4.
Reservation Name Usually the DNS name for the device or client. Choose a name that conforms to DNS naming requirements for best compatibility.
IP Address The IP address that you are reserving for this device or client.
MAC Address The Media Access Control or hardware address of the network card for the device or client. This is a hexadecimal number that is globally unique and is generally printed directly on the device.
Description A descriptive phrase that will make it easier to identify the specific device the reservation is assigned to.
Supported Types The choices are Both, DHCP only, or BOOTP only. BOOTP is an older protocol for automatically assigning IP addresses and configuration details that is no longer commonly used, but selecting the Both option is the best choice unless you have a specific reason not to.
Figure 4. The New Reservation dialog box


Click Add, and the reservation is added. The reservation will inherit the configuration options that have been set for the DHCP scope, and you can add specific options for each reservation.
Windows Small Business Server 2011 : DHCP and DNS (part 3) – Managing DNS, DNS Forwarding