Struggling with managing local users and groups in Windows 11 Home because the Local Users and Groups Management (lusrmgr.msc) tool is unavailable? Don’t worry, you’re not alone. This guide explores alternative solutions to fulfill your needs, including:
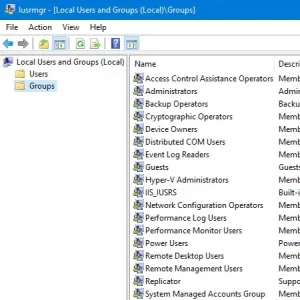
What is Local Users and Groups Management on Windows?
Local Users and Groups Management is a powerful tool for system administrators. It allows them to:
- Create, edit, or delete local user accounts and groups
- Manage system permissions and access controls
- Connect remotely to manage other computers
How to Enable Local Users and Groups Management
Third-party Tool: Lusrmgr.exe
While the built-in Local Users and Groups Management console is missing from Windows 11 Home, you can leverage a third-party alternative called Lusrmgr.exe. It’s a free and portable application available on GitHub, offering functionalities similar to the native tool.
Here’s how to download and use it:
- Head to the lusrmgr GitHub page: https://github.com/akruhler/AccountManagement
- Download the latest version: On the default “Code” tab, scroll down and click the “Download” link to download the most recent version of the file.
- Run the program: Double-click the downloaded “lusrmgr.exe” file.
The program interface closely resembles the built-in Local Users and Groups Management console. However, keep in mind:
- Limited Features: Lusrmgr.exe offers core user and group management functionalities but may not have all the features of the native tool.
- Third-Party Application: Exercise caution when using any third-party software. Make sure you download Lusrmgr.exe from the official GitHub repository linked above.
Here’s what you can do with Lusrmgr.exe:
- Create New User Account: Right-click on “Users” and select “Create.” Fill in the details for the new account and click “Create” after configuring options.

- Manage Existing Users: Right-click on a user and choose “Edit,” “Delete,” “Rename,” or “Set Password” as needed.
- Enable Administrator Account: Use Lusrmgr.exe to activate the hidden administrator account for advanced tasks (proceed with caution).
Command Prompt for Power Users
For those comfortable using the command line, managing users and groups is possible with the “net localgroup” and “net user” commands. This offers a way to view, add, and delete local groups and users.
Open a Command Prompt window with administrator privileges (search “cmd,” right-click on “Command Prompt,” and select “Run as administrator”) and use the following commands:
- View local groups:
net localgroup - View all users in a group:
net localgroup [group name] - Create a new group:
net localgroup xyz /add(replace “xyz” with your desired group name) - View all user accounts:
net user - Create a new user account:
net user abc /add(replace “abc” with your desired username) - View accounts with administrator privileges:
net localgroup administrators - Add a user to the administrator group:
net localgroup Administrators abc /add(replace “abc” and “Administrators” if needed) - Delete a group:
net localgroup xyz /delete - Delete a user:
net user abc /delete
For detailed syntax information on any command, use: net help <command>
Remember: The command prompt approach requires a deeper understanding of command-line syntax compared to the third-party tool or the built-in console (if you had access to it).
Choose the solution that best suits your comfort level and technical expertise. While Windows 11 Home doesn’t natively offer the Local Users and Groups Management console, these alternatives provide ways to manage local users and groups effectively.
Related:


